
Türkiye'de ilk Mobil & PC Aynı Anda Metin2 Oyna. Triarchonline kalıcı ve uzun ömürlü yapısı ile 24 Temmuz'da açılıyor. | 1-99 Mobil Metin2 Triarch HEMEN TIKLA!
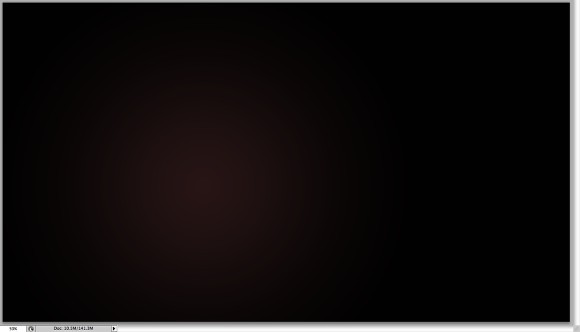
Open Photoshop and create a new document. I used 2560x1440 pixels. Then with the Gradient Tool (G) fill the background with a radial gradient with 2 shades of purple (3d2626) Lighter and (060404) darker.
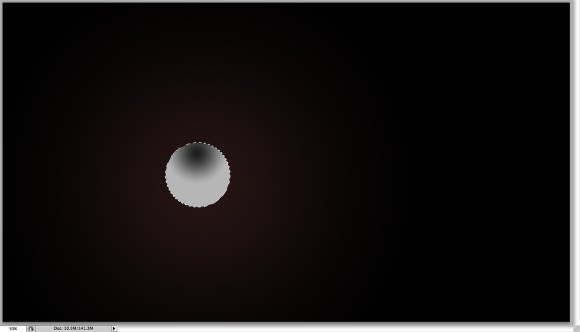
With the Elliptical Marquee Tool (M) create an ellipse selection. Add a new layer and select the Gradient Tool (G). Use black and a very light grey for the colors. Fill the ellipse selection with the radial gradient. Use the image below for reference.
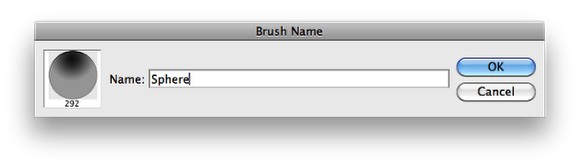
Go to Edit>Define Brush to create a new brush.
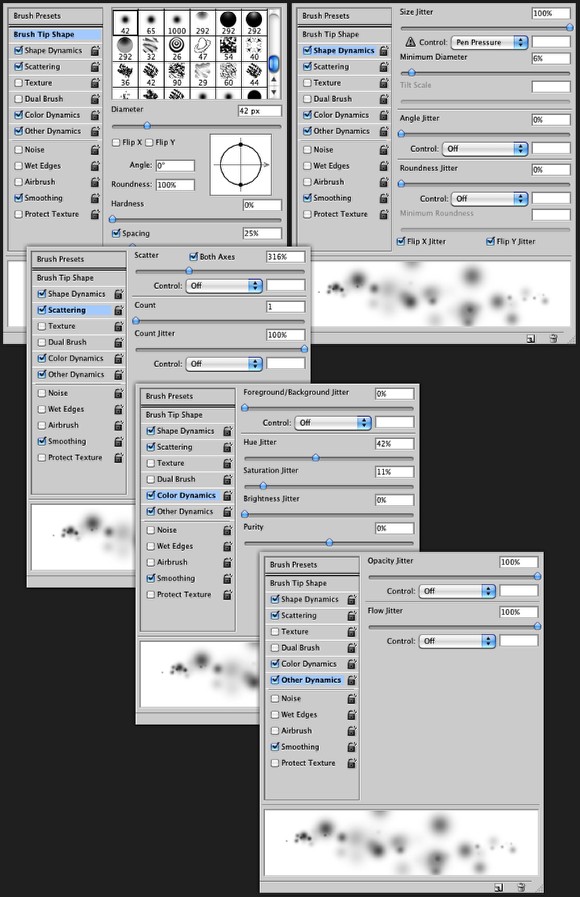
Go to Window>Brushes. Use the image below for the values of the Brush Tip Shape, Shape Dynamics, Scattering, Color Dynamics and Other Dynamics.
Add a new layer and with the Brush Tool (B) and the brush you have just created, paint some spheres on the design. This is a random effect so you won't get the same result as I did.
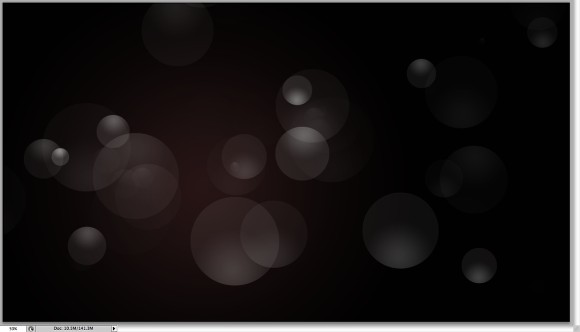
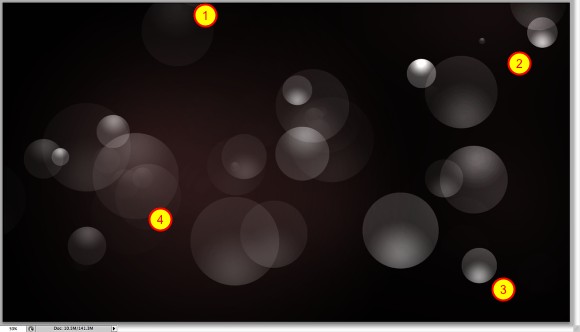
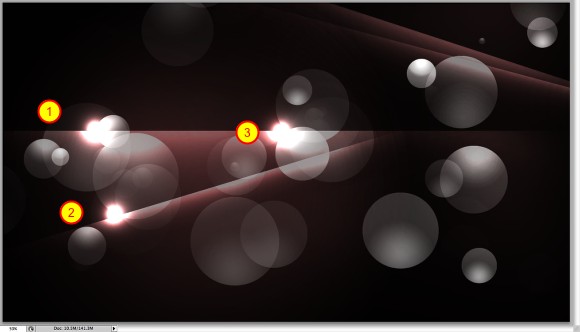
Add another layer and group this layer. This new layer will be inside a folder in the Layer Palettes. Change the folder's Blend Mode to Color Dodge. Then, with the Brush Tool (B), select white for the color and a big soft brush to paint some areas to highlight them (1-4). Tip: Use the numbers 1-0 to change the opacity of the brush, with 1 being 10% and 0 being 100%.
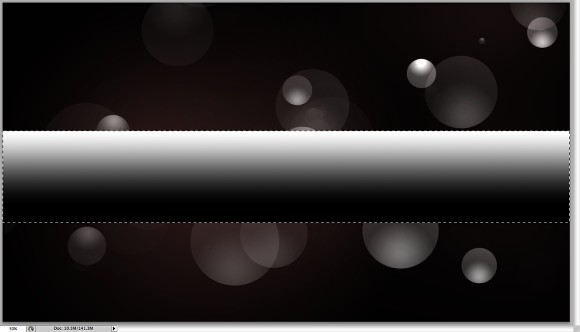
Add a new layer and with the Rectangular Marquee Tool (M), create a rectangular selection. Fill this selection with a white to black linear gradient using the Gradient Tool (G). After that change the Blend Mode to Color Dodge to create a nice light effect.
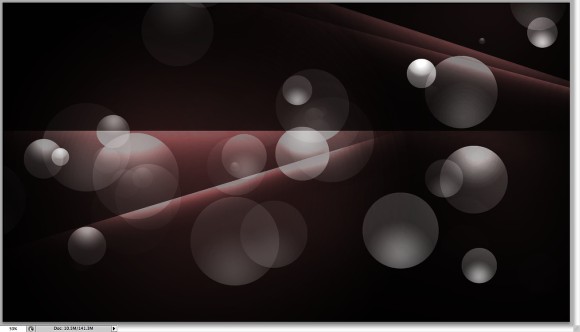
Duplicate the light effect layer. Rotate and resize them to create different light effects. Tip: Use the Eraser Tool (E) to blend some of the light effects one they are over one another.
Add a new layer and group this layer so it will be inside a folder. Change the Blend Mode of the folder to Color Dodge. With the Brush Tool (G), using white for the color, select the layer inside the folder and paint some flares (1-3)
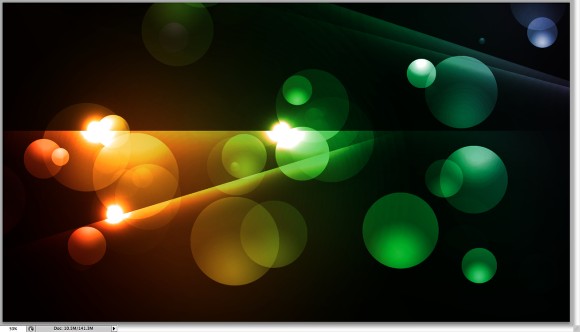
Add another layer on top of the others, then with the Gradient Tool (G) fill the layer with a gradient using red, yellow, green and blue for the colors. Change the Blend Mode of this layer to Overlay.
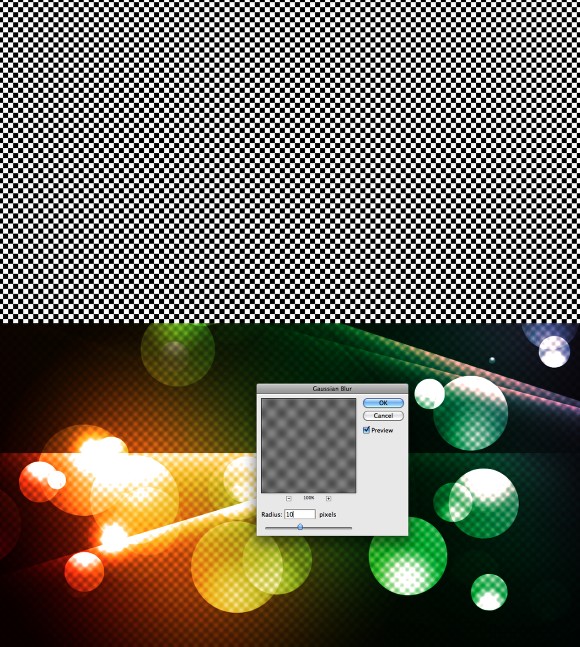
Create a new layer and fill it with a checkerboard pattern. You can download it here. Then go to Filter>Blur>Gaussian Blur, use 10 pixels for the Radius. After that change its Blend Mode to Color Dodge.
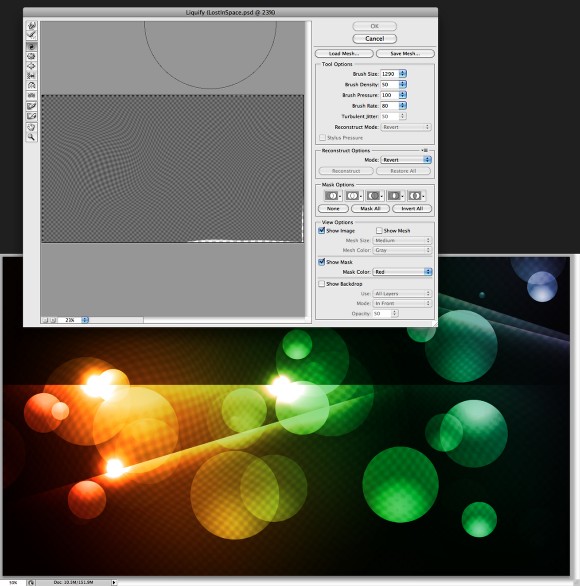
Select the pattern layer and go to Filter>Liquify. Use the Twirl Clockwise Tool (C) and the Bloat Tool (B) to deform the pattern layer.
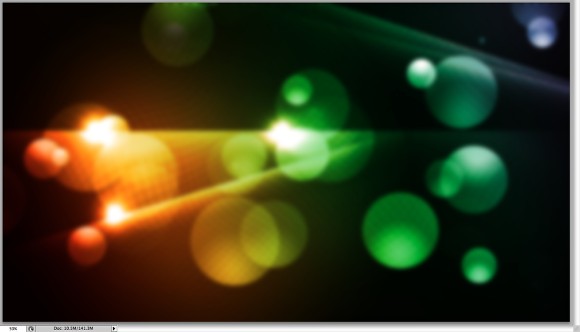
Select all layers and click Command(mac)/Control PC + Alt + Shift + E to create a layer with all the layers merged in it. Go to Filter>Blur>Gaussian Blur. Use 20 pixels for the Radius. Then change the Blend Mode to Screen and the Opacity to 50%. Once again click on Command(mac)/Control PC + Alt + Shift + E to create a layer with the final design.
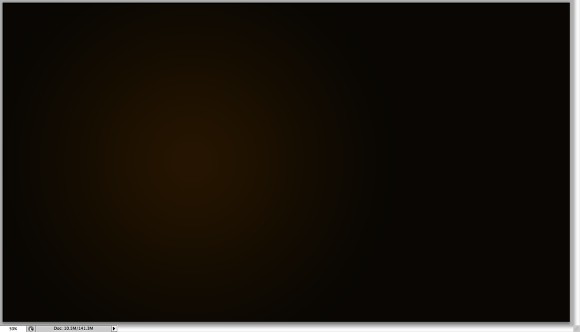
To create the text effect we will add a new layer for a new background. You can duplicate the same layer from the Step 1 and just change the colors, instead of a purple hue I used a brown. The light one is 3b2500 and the dark 130f08.
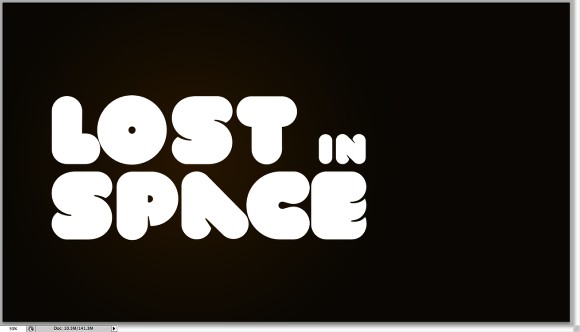
Select the Horizontal Type Tool (T) and type "Lost in Space" like a did in the image below. Make the words "Lost" and "Space" much bigger than the "In". Then change the font to VAL. You can download it here (
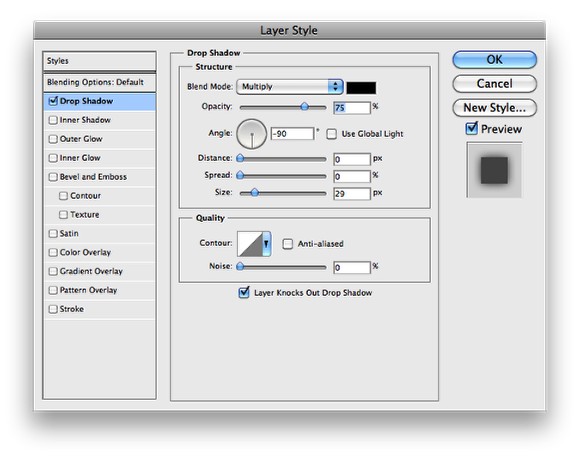
Go to Layer>Layer Styles>Drop Shadow. Use Multiply for the Blend Mode, black for the color, -90º for the angle, 0 for Distance and Spread and 30 for Size.
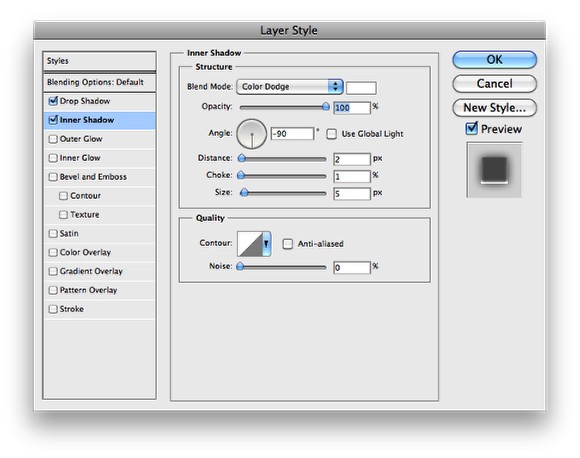
Select now Inner Shadow. use Color Dodge for the Color with White, 100% for the Opacity, 2 pixels for the DIstance, 1 for Choke and 5 pixels for Size.
Move the layer with the design merged to be on top of the other layers, more specifically on top of the text layer. Then go to Layer>Create Clipping Mask.
Go to Google Images and search for some eclipse photos, I found this amazing one at
Duplicate the eclipse layer and position it on top of the other ones that were in the design, the difference is that now it will look like the lights are coming out of the text.

Merge all the layers again and you can add a little noise (Filger>Noise>Add Noise). The effect is very simple and won't take you more than 20-30 minutes to achieve it. But it's a nice exercise for those willing to play with light effects, also clipping mask and text effects in Photoshop.
With the Elliptical Marquee Tool (M) create an ellipse selection. Add a new layer and select the Gradient Tool (G). Use black and a very light grey for the colors. Fill the ellipse selection with the radial gradient. Use the image below for reference.
Go to Edit>Define Brush to create a new brush.
Go to Window>Brushes. Use the image below for the values of the Brush Tip Shape, Shape Dynamics, Scattering, Color Dynamics and Other Dynamics.
Add a new layer and with the Brush Tool (B) and the brush you have just created, paint some spheres on the design. This is a random effect so you won't get the same result as I did.
Add another layer and group this layer. This new layer will be inside a folder in the Layer Palettes. Change the folder's Blend Mode to Color Dodge. Then, with the Brush Tool (B), select white for the color and a big soft brush to paint some areas to highlight them (1-4). Tip: Use the numbers 1-0 to change the opacity of the brush, with 1 being 10% and 0 being 100%.
Add a new layer and with the Rectangular Marquee Tool (M), create a rectangular selection. Fill this selection with a white to black linear gradient using the Gradient Tool (G). After that change the Blend Mode to Color Dodge to create a nice light effect.
Duplicate the light effect layer. Rotate and resize them to create different light effects. Tip: Use the Eraser Tool (E) to blend some of the light effects one they are over one another.
Add a new layer and group this layer so it will be inside a folder. Change the Blend Mode of the folder to Color Dodge. With the Brush Tool (G), using white for the color, select the layer inside the folder and paint some flares (1-3)
Add another layer on top of the others, then with the Gradient Tool (G) fill the layer with a gradient using red, yellow, green and blue for the colors. Change the Blend Mode of this layer to Overlay.
Create a new layer and fill it with a checkerboard pattern. You can download it here. Then go to Filter>Blur>Gaussian Blur, use 10 pixels for the Radius. After that change its Blend Mode to Color Dodge.
Select the pattern layer and go to Filter>Liquify. Use the Twirl Clockwise Tool (C) and the Bloat Tool (B) to deform the pattern layer.
Select all layers and click Command(mac)/Control PC + Alt + Shift + E to create a layer with all the layers merged in it. Go to Filter>Blur>Gaussian Blur. Use 20 pixels for the Radius. Then change the Blend Mode to Screen and the Opacity to 50%. Once again click on Command(mac)/Control PC + Alt + Shift + E to create a layer with the final design.
To create the text effect we will add a new layer for a new background. You can duplicate the same layer from the Step 1 and just change the colors, instead of a purple hue I used a brown. The light one is 3b2500 and the dark 130f08.
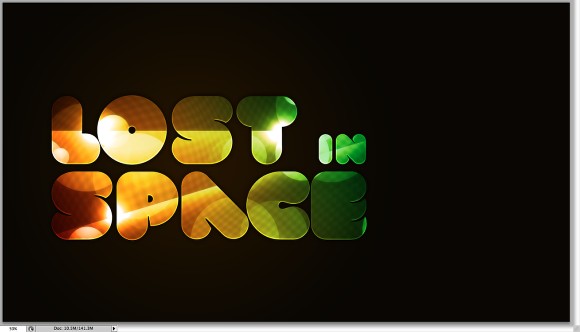
Select the Horizontal Type Tool (T) and type "Lost in Space" like a did in the image below. Make the words "Lost" and "Space" much bigger than the "In". Then change the font to VAL. You can download it here (
Linkleri görebilmek için Turkmmo Forumuna ÜYE olmanız gerekmektedir.
). Use white for the color.
Go to Layer>Layer Styles>Drop Shadow. Use Multiply for the Blend Mode, black for the color, -90º for the angle, 0 for Distance and Spread and 30 for Size.
Select now Inner Shadow. use Color Dodge for the Color with White, 100% for the Opacity, 2 pixels for the DIstance, 1 for Choke and 5 pixels for Size.
Move the layer with the design merged to be on top of the other layers, more specifically on top of the text layer. Then go to Layer>Create Clipping Mask.
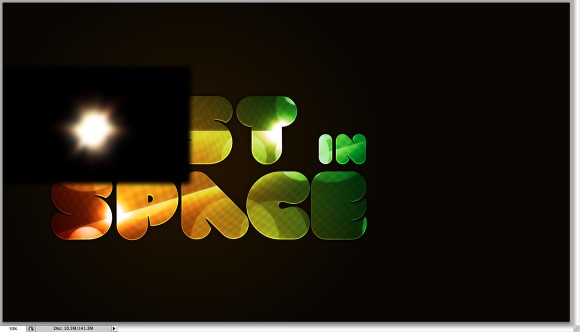
Go to Google Images and search for some eclipse photos, I found this amazing one at
Linkleri görebilmek için Turkmmo Forumuna ÜYE olmanız gerekmektedir.
. Copy it and paste it in your design. Go to Image>Adjustments>Levels. Increase the black input. Change the Blend Mode to Screen. Also go to Filter>Blur>Gaussian Blur. Use 5 pixels for the Radius.
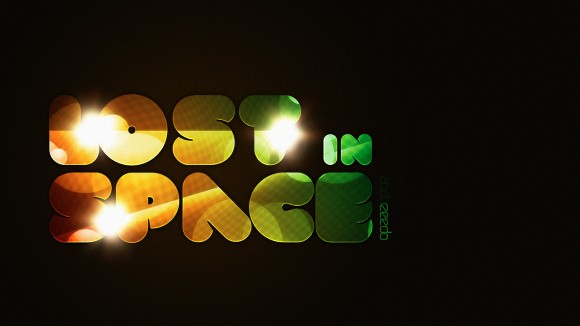
Duplicate the eclipse layer and position it on top of the other ones that were in the design, the difference is that now it will look like the lights are coming out of the text.
Merge all the layers again and you can add a little noise (Filger>Noise>Add Noise). The effect is very simple and won't take you more than 20-30 minutes to achieve it. But it's a nice exercise for those willing to play with light effects, also clipping mask and text effects in Photoshop.

Şu an konuyu görüntüleyenler (Toplam : 0, Üye: 0, Misafir: 0)
Benzer konular
- Cevaplar
- 3
- Görüntüleme
- 198
- 5.00 yıldız(lar) 1 Değerlendirme
- Cevaplar
- 3
- Görüntüleme
- 119
- Cevaplar
- 3
- Görüntüleme
- 154