
HERAKLES Otomatik Avlı kalıcı sunucu. 19 Haziran'da açılıyor. Atius & Wizard güvencesiyle hemen kayıt ol, ön kayıt ödülleri aktif. HEMEN TIKLA!
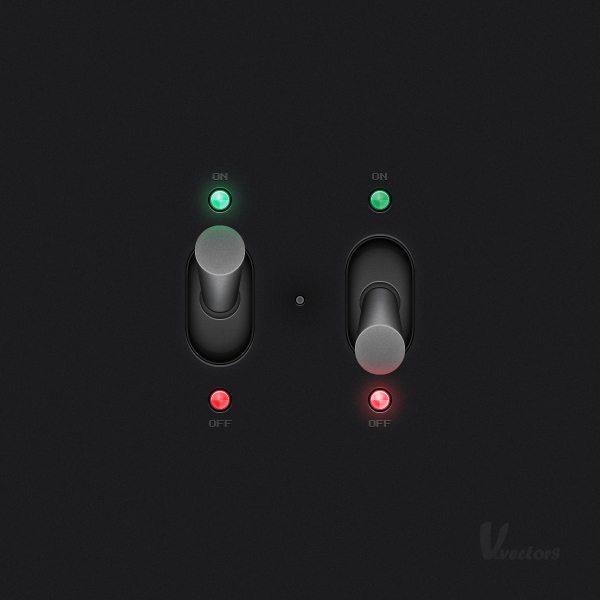
Final :
Alıntı:
Step 1
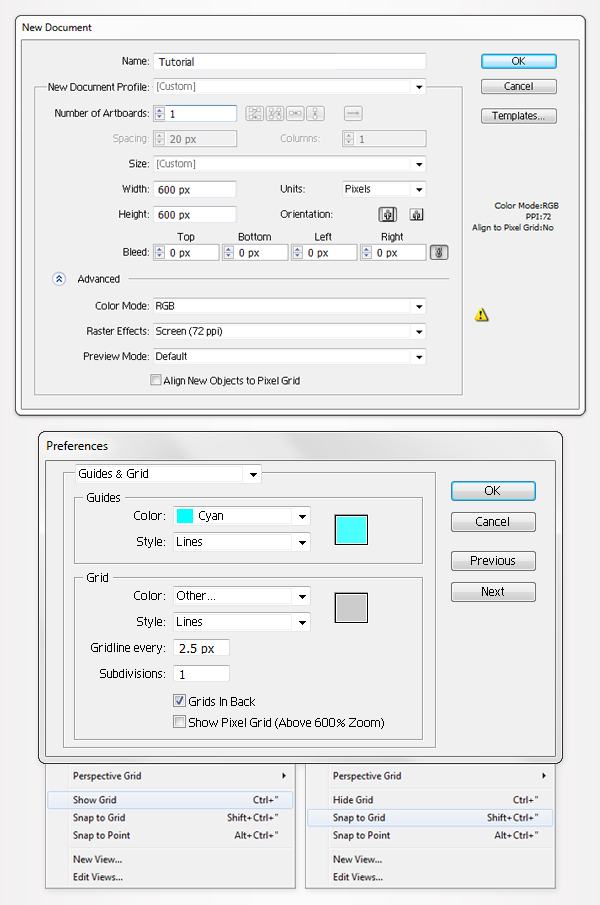
Hit Command + N to create a new document. Enter 600 in the width and height boxes, then click on the Advanced button. Select RGB, Screen (72ppi) and make sure that the Align New Objects to Pixel Grid box is unchecked before your click OK.
Now, turn on the Grid (View > Grid) and the Snap to Grid (View > Snap to Grid). Next, youll need a grid every 2.5px. Go to Edit > Preferences > Guides & Grid, enter 2.5 in the Gridline every box, and 1 in the Subdivisions box.
You can also open the Info panel (Window > Info) for a live preview with the size and position of your shapes. Do not forget to set the unit of measurement to pixels from Edit > Preferences > Unit > General. All these options will significantly increase your work speed.
Adım 1 Hit Komut + N yeni bir belge oluşturmak. 600 Girin, genişlik ve yükseklik kutuları, ardından Gelişmiş düğmesini. RGB seçeneğini belirleyin, Ekran (72 ppi) ve emin olun Yeni Nesnelerin Piksel Izgara onay kutusu işaretli değilse, önce TAMAM'ı tıklatın. Şimdi, Grid (View > Grid) ve Izgara (View > Snap to Grid). Bir Sonraki, bir kılavuz her 2.5px kablo bağlantısını Düzen > Tercihler > Kılavuzları ve Grid, 2.5 girin, Kılavuz Çizgisini her kutusu, ve 1 Alt Bölümlerini onay kutusunu işaretleyin.
Alıntı:
Step 2
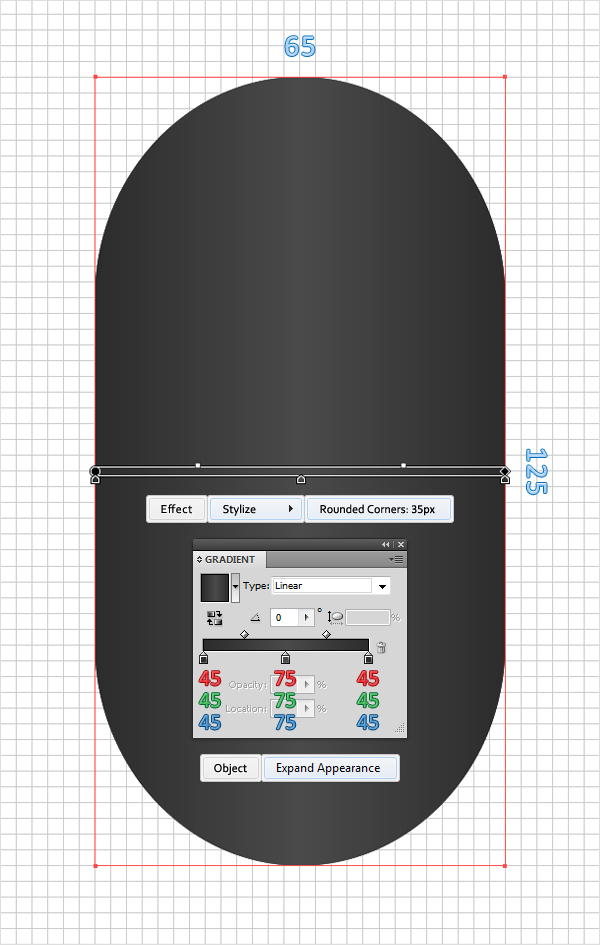
Pick the Rectangle Tool (M) and create a 65 by 125px. Fill it with the linear gradient shown below and remove the color from the stroke. Make sure that your shape is still selected and go to Effect > Stylize > Rounded Corners. Enter a 25px radius, click OK, and go to Object > Expand Appearance.
Adım 2 Alma, Dikdörtgen Aracı (M) ve bir 65 125 px kablo bağlantısını Bu lineer gradyan aşağıda gösterilen ve renk açma kapama. Emin olun, şekli ve git Etkisi > Onaylı Uygulamalarla > yuvarlatılmış köşeler. Bir Girin 25px yarıçapı, TAMAM'ı tıklatın ve Nesne > Görünümü genişletin.
Alıntı:
Step 3
Reselect the rounded rectangle created in the previous step and make two copies in front (Command + C > Command + F > Command + F). Select the top copy and hit the up arrow four times. Thanks to the Snap to Grid your shape will move 10px up. Reselect both copies, open the Pathfinder panel (Window > Pathfinder), and click on the Minus Front button. Fill the resulting shape with the linear gradient shown below and lower its Opacity to 30%.
3. Adım Yeniden Seçin, yuvarlaklaştırılmış dikdörtgen, önceki adım ve iki kopya ön (Komut + C > Komut + F > Komut + F). Seçim, üst kopyala ve yukarı ok dört kez. Sayesinde, Izgara, şekil, hareket 10px. Yeniden Seçin her iki kopyası, açık, Pathfinder (Pencere > Pathfinder), ve Eksi Ön. Doldurma ortaya çıkan şekil, linear gradient aşağıda gösterilen ve Yoğunluğu %30.

Alıntı:
Step 4
Reselect the rounded rectangle created in the second step and make two new copies in front (Command + C > Command + F > Command + F). Select the top copy and this time hit the down arrow four times. Reselect the two copies, go to the Pathfinder panel, and click on the Minus Front button. Again, fill the resulting shape with the linear gradient shown below and lower its Opacity to 30%.
4. Adım Yeniden Seçin, yuvarlaklaştırılmış dikdörtgen, ikinci adım ve iki yeni kopyalar ön (Komut + C > Komut + F > Komut + F). Seçim, üst düzey kopya ve bu kez, aşağı ok dört kez. Yeniden Seçin iki kopyası, Pathfinder, ve Eksi Ön. Tekrar doldurma, ortaya çıkan şekil, linear gradient aşağıda gösterilen ve Yoğunluğu %30.

Alıntı:
Step 5
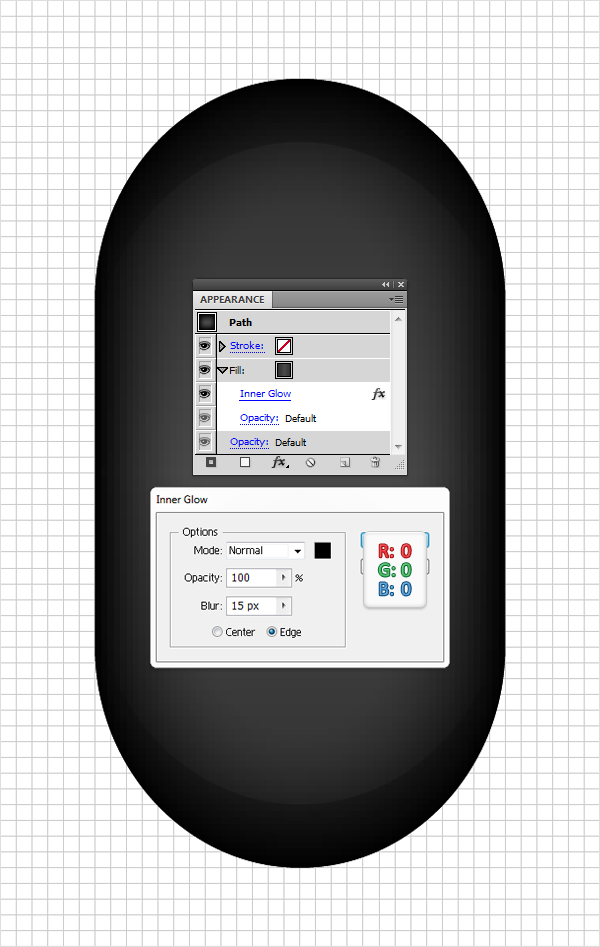
Reselect the rounded rectangle and focus on the Appearance panel. Select the existing fill and go to Effect > Stylize > Inner Glow. Enter the data shown below and click OK.
5. Adım Yeniden Seçin, yuvarlaklaştırılmış dikdörtgen ve Görünümü. Seçin ve git Etkisi > > Onaylı Uygulamalarla iç. Verileri Girin aşağıda gösterildiği gibi yerleştirin ve TAMAM'ı tıklatın.
Alıntı:
Step 6
Reselect your rounded rectangle and focus on the Appearance panel. Select the existing fill and click on the Duplicate Selected Item button. Its the little file icon located at the bottom of the Appearance panel.
Obviously, this will add a copy of the selected fill. Select this new fill, replace the linear gradient with a flat black, lower its Opacity to 7%, change the blending mode to Multiply and go to Effect > Artistic > Film Grain. Enter the data shown below and click OK.
6. Adım Yeniden Seçin yuvarlatılmış dikdörtgen ve Görünümü. Select mevcut yağını doldurunuz ve Yinelenen Seçili Öğe. Bu, küçük dosya simgesi alt kısmında bulunan Görünümü. Tabii ki, bu bir kopya, seçilen doldurma. Bu yeni dolum, doğrusal eğim düz bir siyah, düşük Yoğunluğu - 7 %, karıştırma modu ile çarpar ve Etkisi > Sanat > Film. Verileri Girin aşağıda gösterildiği gibi yerleştirin ve TAMAM'ı tıklatın.

Alıntı:
Step 7
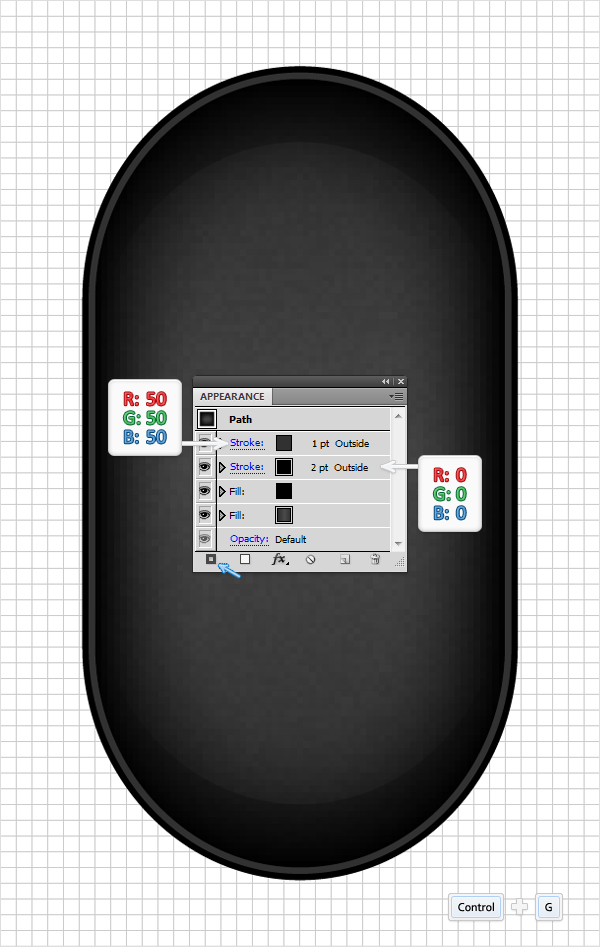
Reselect your rounded rectangle and add a first stroke. Make it black, 2pt wide, and align it to outside. Make sure that your shape is still selected, focus on the Appearance panel, and add a new stroke using the Add New Stroke button. Its the little black square located at the bottom of the Appearance panel.
Select this new stroke, make it 1pt wide, and set its color at R=50, G=50, B=50. Now align it to outside. Select all the shapes created so far and group them (Command + G).
7. Adım Yeniden Seçin yuvarlatılmış dikdörtgen ve bir ilk. Bu siyah, 2pt geniş ve hizalayın. Emin olun şekli, hala seçili, focus, Görünüm, ekle ve yeni bir hareket ile Yeni Ekle Açma Kapama düğmesi. Bu, küçük siyah kare alt kısmında bulunan Görünümü. Bu yeni, 1pt geniş ve rengi de R=50, G=50, B=50. Şimdi hizalayın. Bütün şekiller oluşturulan bugüne kadar ve grup (Komut + G).
Alıntı:
Step 8
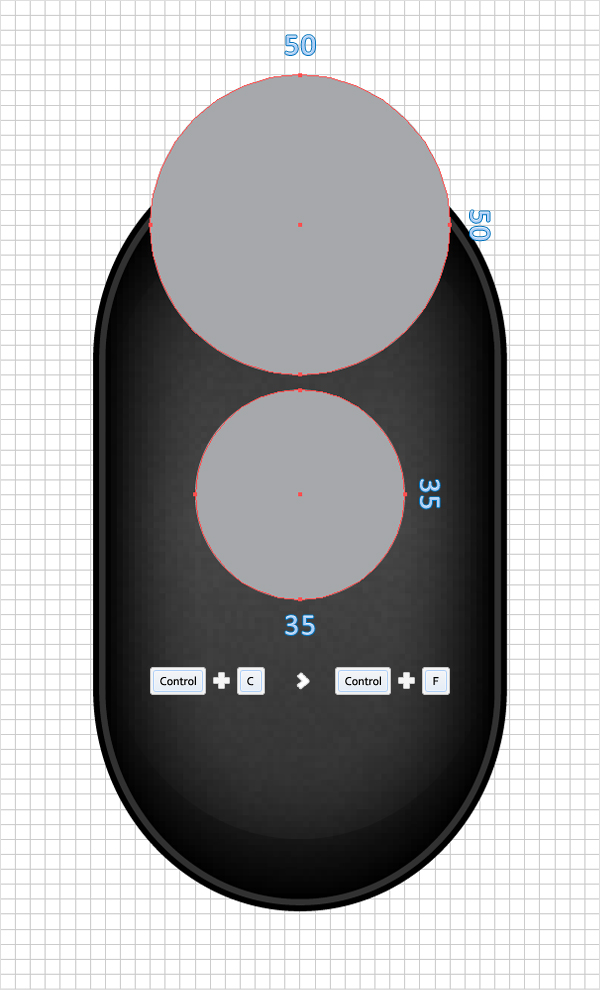
Pick the Ellipse Tool (L) and create two perfect circles. One should be 50px wide and the other should be only 35px wide. Fill them with a random color, remove the color from the stroke, place them as shown in the following image, then duplicate them (Command + C > Command + F).
Adım 8 Pick Elips Aracı (L) ve iki mükemmel daire. Bir 50px genişliğinde ve diğer yalnızca 35px genişliğinde. Bunları Doldurmak rastgele renk, renk, hareket, bunları aşağıdaki resimde gösterildiği gibi, daha sonra çift (Komut + C > Komut + F).
Alıntı:
Step 9
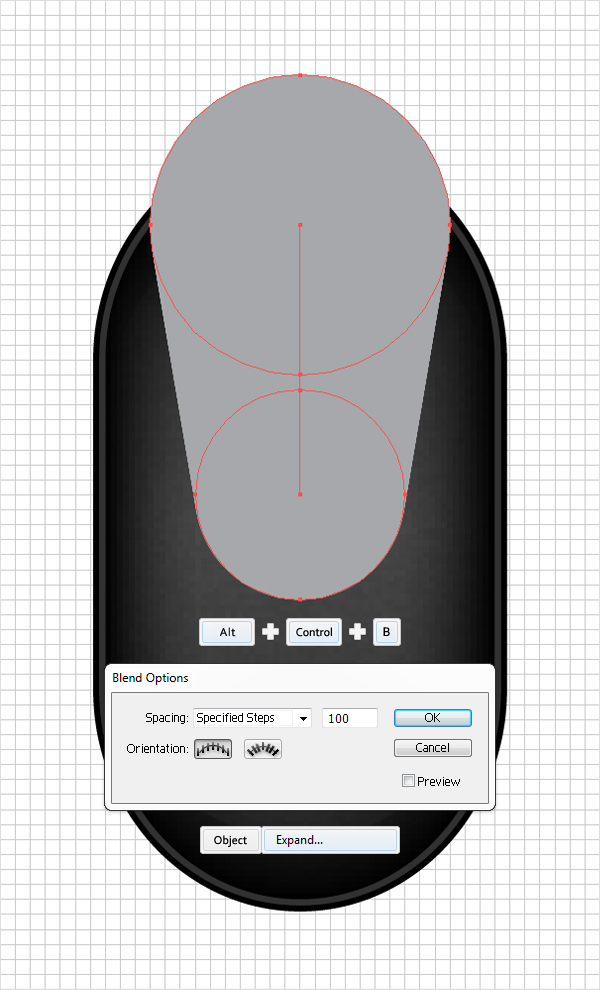
Focus on the two copies created at the end of the previous step. Select these two circles and hit Alt + Command + B. This will add a simple blend between these two shapes. Now you need to edit it. Make sure that your blend is selected and Double-click on the Blend Tool from the Toolbar (or got to Object > Blend > Blend Options).
Select Specified Steps from the Spacing drop down menu, enter 100 in the white box, and click OK. Now your blend should look like the following image. Reselect it and go to Object > Expand.
9. Aşama , iki kopyası oluşturulan önceki aşamaya geçiniz. Bu iki daire ve Alt + Kumanda + B. Bu basit bir karışımı bu iki şekiller. Şimdi düzenlemek. Emin olun karıştırın ve üzerine çift tıklayın, Alet Araç Çubuğu (veya için Nesne > > Karıştırın Karıştırın). Belirtilen Seçin Adımları Aralığı açılır menü, 100 beyaz kutuda, ve TAMAM'ı tıklatın. Şimdi üst üste olmalıdır aşağıdaki görüntü.
Alıntı:
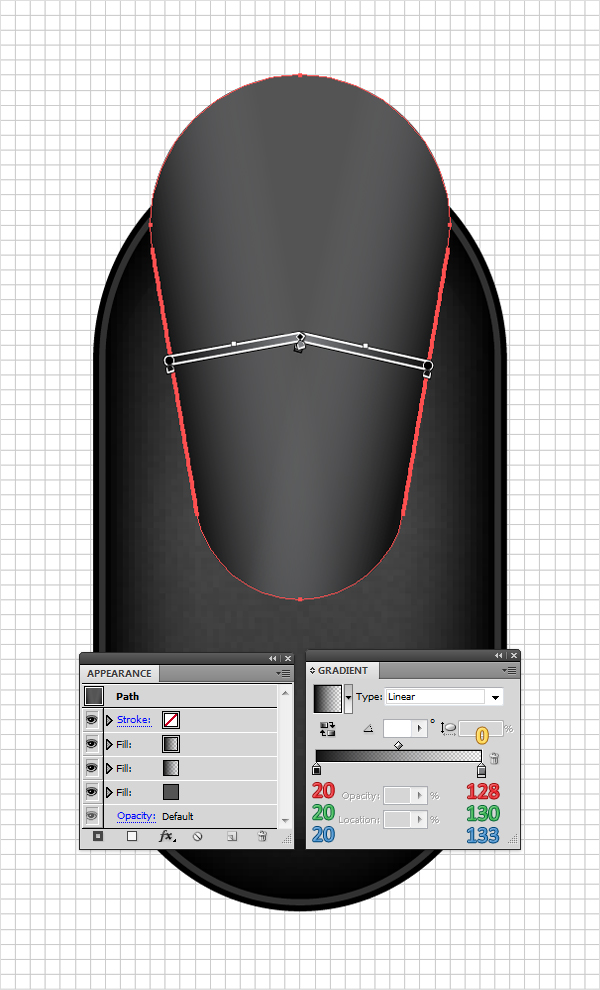
Step 10
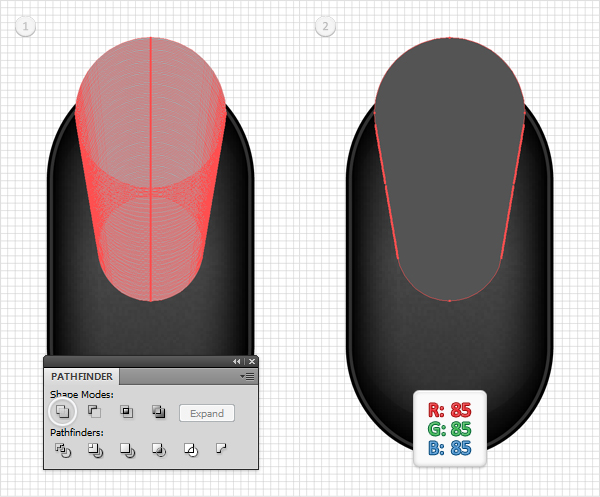
Reselect the group of circles created in the previous step and click on the Unite button from the Pathfinder panel. Fill the resulting shape with R=85, G=85, B=85.
Adım 10 Yeniden Seçin, grup daireler, önceki adım ve Unite (Pathfinder. Doldurma ortaya çıkan şekil R=85, G=85, B=85.
Alıntı:
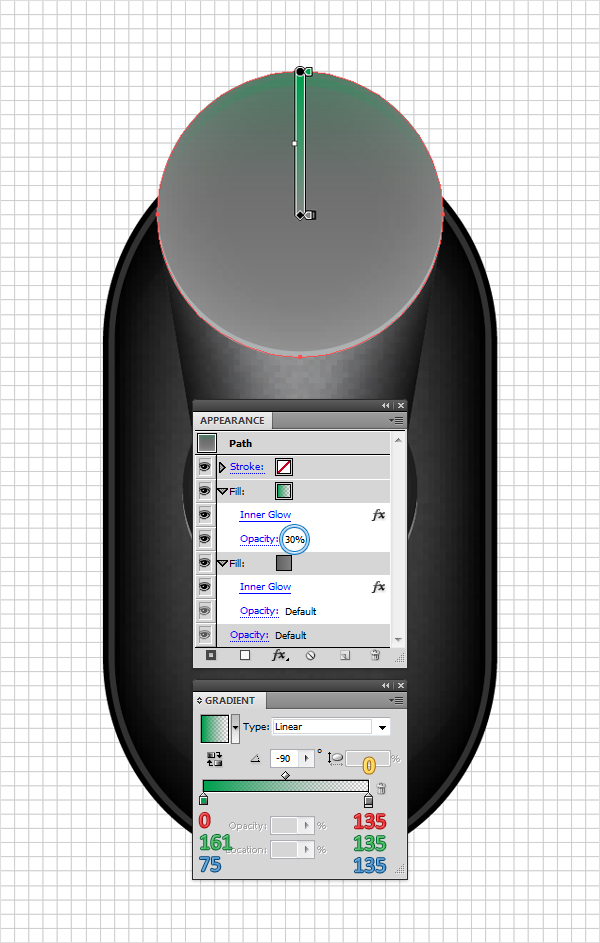
Step 11
Reselect the shape created in step 10 and add two new fills using the Add New Fill button. Its the little, white square located at the bottom of the Appearance panel. Select these new fills one by one and use the linear gradient shown in the following image. The yellow zero from the gradient image stands for Opacity percentage.
Adım 11 Yeniden Seçin şekli oluşturulur adım 10 ve iki yeni dolduran kullanarak Yeni Ekle butonuna doldurun. Bu, küçük, beyaz kare alt kısmında bulunan Görünümü. Bu yeni dolduran bir bir ve doğrusal eğim aşağıdaki görüntü. Sarı sıfır, eğim görüntü için Yoğunluğu yüzde.
Alıntı:
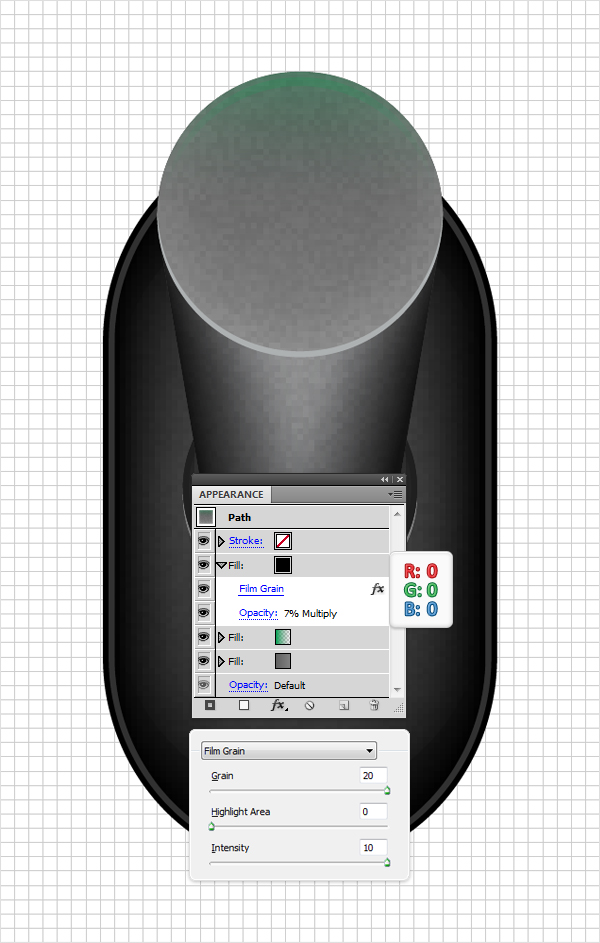
Step 12
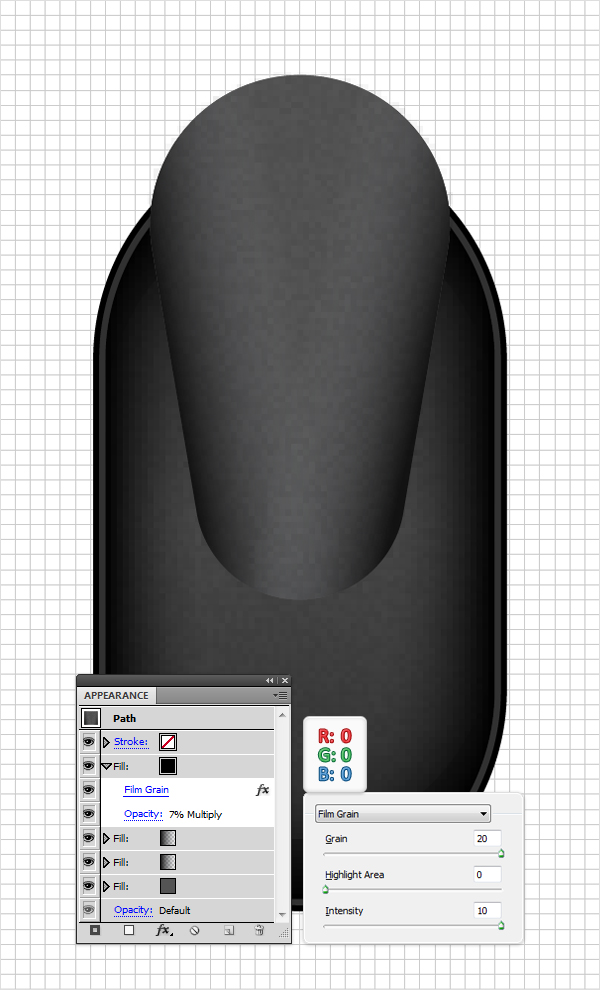
Reselect the shapes edited in the previous step and add a fourth fill. Make it black, lower its Opacity to 7%, change the blending mode to Multiply, and go to Effect > Artistic > Film Grain. Enter the data shown below and click OK.
Adım 12 Yeniden Seçin, şekilleri düzenlenmiş, bir önceki adım ve bir dördüncü doldurun. Bu siyah, düşük Yoğunluğu - 7 %, karıştırma modu ile, ve Etkisi > Sanat > Film. Verileri Girin aşağıda gösterildiği gibi yerleştirin ve TAMAM'ı tıklatın.
Alıntı:
Step 13
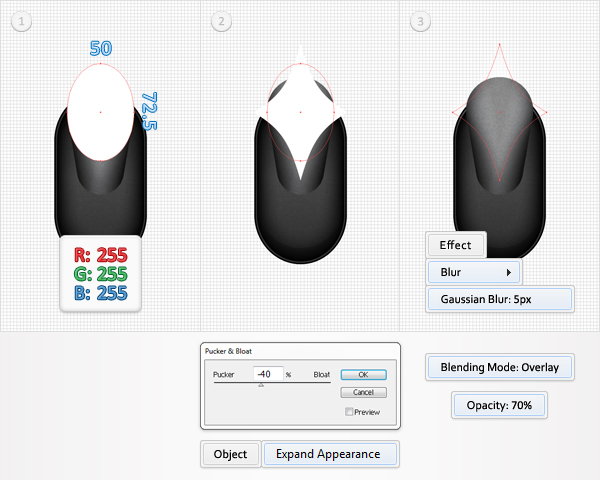
Pick the Ellipse Tool (L) and create a 50 by 72.5px shape. Fill it with white, place it as shown in the first image, and go to Effect > Distort & Transform > Pucker & Bloat. Drag the slider to -40%, click OK, and go to Object > Expand Appearance. Lower the Opacity of the resulting shape to 70%, change its blending mode to Overlay, and go to Effect > Blur > Gaussian Blur. Enter a 5px radius and click OK.
Adım 13 Pick Elips Aracı (L) ve bir 50 ile 72.5px şekli. Bu beyaz, gösterildiği gibi ilk görüntü, ve Etkisi > Bozan ve Dönüşüm > Pucker & Bloat. Için kaydırıcıyı sürükleyin -40 %, TAMAM'ı tıklatın, ve Nesne > Görünümü genişletin. Alt dolaysıyla ortaya çıkan şekli %70, bu karıştırma modu yerleştirmek için, ve Etkisi > Blur > Gauss. Bir 5px radius ve TAMAM'ı tıklatın.
Alıntı:
Step 14
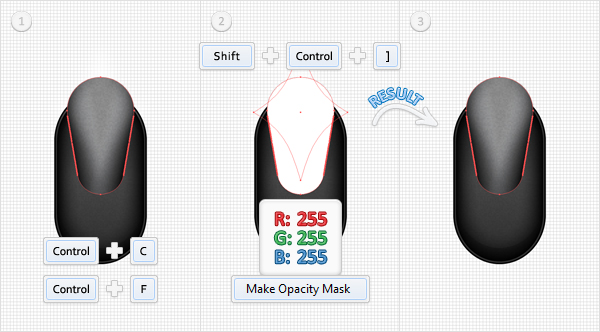
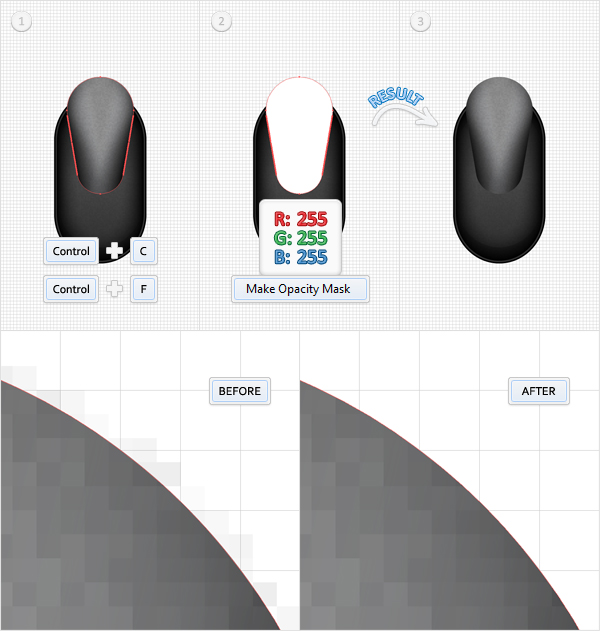
Next, you need to mask the shape created in the previous step. Reselect the shape created in step 10 and make a copy in front (Command + C > Command + F). Select this copy, bring it to front (Shift + Command + Right Bracket key), and hit the D key from your keyboard. This will add the default properties for your shape (white fill and a 1pt, black stroke).
Remove the stroke, then select the remaining white shape, along with the star shape (created in the previous step), and go to the Transparency panel (Window > Transparency). Open the fly-out menu and click on Make Opacity Mask. Move to the Layers panel and lock this masked shape.
Adım 14 Sonraki, maske, şekli, önceki aşamaya geçiniz. Yeniden Seçin şekli oluşturulur adım 10 ve bir kopyasını da ön (Komut + C > Komut + F). Bu kopya, onu (Shift + Komut + Sağ Ayağı anahtar), ve D tuşuna, klavye. Bu varsayılan özellikler, şekil (beyaz ve 1 pt, siyah hareketi).
Alıntı:
Step 15
Return to the shape created in step 10. Have a closer look at this shape and youll notice that the edges are a bit pixelated. Its because of the Film Grain effect. Its not a big deal but its better to mask it.
So, make a copy of this shape and fill it only with white. Select it along with the original shape, go to the Transparency panel, open the fly-out menu and click on Make Opacity Mask. Have a new look at the edges of this shape and youll notice that the pixelated edges are gone.
Adım 15 Geri Dönüş şekli oluşturulur adım 10. Bir göz bu şekil ve olduğunu göreceksiniz, kenarları bir bit ve piksellenmiş görünüyor. Bunun nedeni, Film Tahıl etkisi. Bu büyük bir anlaşma ancak daha iyi maske. Bu nedenle, bir kopyasını bu şekli ve bu sadece beyaz. Seçin ile birlikte, orijinal şekli, şeffaflık, açık açılan menü ve dolaysıyla Yapın Maskesi. Yeni bir görünüme sahip kenarlarından bu şekil ve olduğunu göreceksiniz, kenarları ve piksellenmiş görünüyor artık.
Alıntı:
Step 16
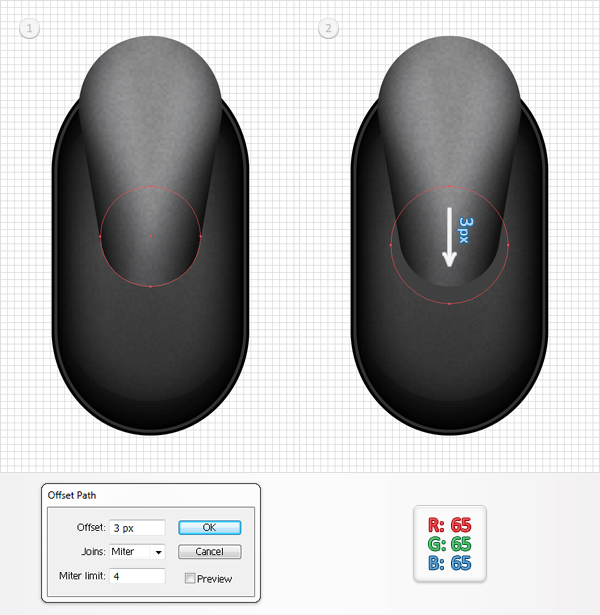
Disable the Snap to Grid (View > Snap to Grid). Go to Edit > Preferences > General and make sure that the Keyboard Increment is set at 1px. Move to the Layers panel and find the 35px circle created in step 8. Select it and go to Object > Path > Offset Path. Enter a 3px radius and click OK. Fill the resulting shape with R=65, G=65, B=65. Now move it 3px down. Simply select your shape and hit the down arrow three times.
Adım 16 Devre Dışı Bırakmak, Izgara (View > Snap to Grid). Düzen > Tercihler > Genel ve Klavye Artış, 1px kablo bağlantısını Hareket Katmanlar paneli ve 35px daire içinde oluşturulan adım 8. Seçiniz ve Object > Path > Ofset Yolu. Bir 3px radius ve TAMAM'ı tıklatın. Doldurma ortaya çıkan şekil R=65, G=65, B=65. Şimdi bu 3px aşağı. Seçin, şekil ve aşağı ok üç kez.
Alıntı:
Step 17
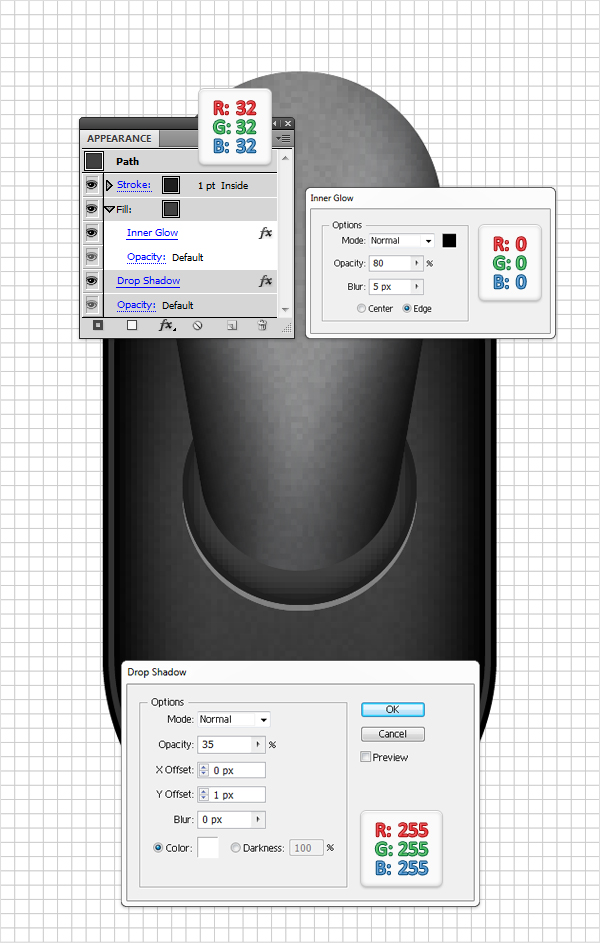
Reselect the shape created in the previous step and focus on the Appearance panel. Select the existing fill and go to Effect > Stylize > Inner Glow. Enter the data shown below, then add a stroke for the circle. Make it 1pt wide and set its color at R=32, G=32, B=32. Now align it to inside. Reselect this circle, make sure that no fill or stroke is selected, and go to Effect > Stylize > Drop Shadow. Again, enter the data shown below and click OK.
Adım 17 Yeniden Seçin, şekli, önceki adım ve Görünümü. Seçin ve git Etkisi > > Onaylı Uygulamalarla iç. Verileri Girin aşağıda gösterilen, sonra bir hareket için, daire. Bunu 1pt geniş ve rengi de R=32, G=32, B=32. Şimdi göre hizalayın. Yeniden Seçin bu daire, emin olun doldurma veya açma kapama, ve Etkisi > Onaylı Uygulamalarla > Gölge. Tekrar girin, aşağıdaki verileri ve TAMAM'ı tıklatın.
Alıntı:
Step 18
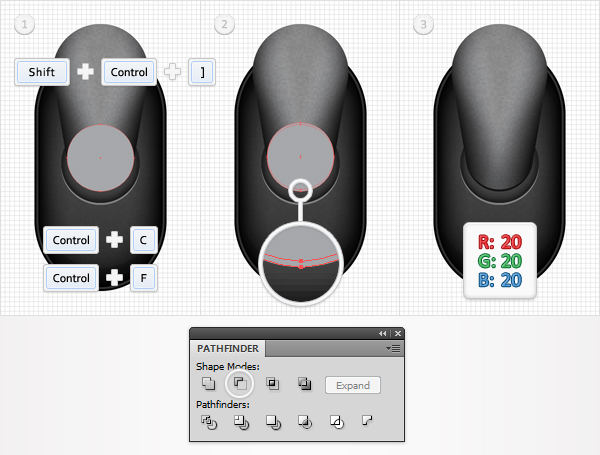
Reselect the 35px circle created in step 8, bring it to front (Shift + Command + Right Bracket key), and make a copy in front (Command + C > Command + F). Select this copy and hit the up arrow once. Reselect both circles and click on the Minus Front button from the Pathfinder panel. Fill the resulting shape with R=20, G=20, B=20.
Adım 18 Yeniden Seçin 35px daire oluşturulur adım 8 'de, onu (Shift + Komut + Sağ Ayağı), ve bir kopyasını da ön (Komut + C > Komut + F). Bu kopyala ve yukarı ok bir kere. Her ikisini de seçin ve tıklatın Ön Eksi düğmesine Pathfinder. Doldurma ortaya çıkan şekil R=20, G=20, B=20.
Alıntı:
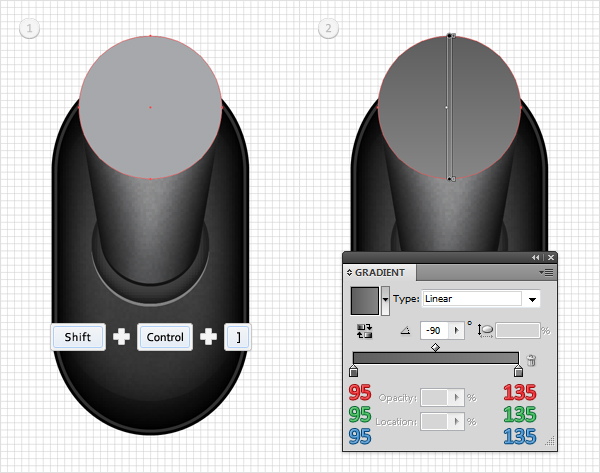
Step 19
Reselect the 50px circle created in step 8, bring it to front (Shift + Command + Right Bracket key), and replace the flat color with the linear gradient shown below.
Adım 19 Yeniden Seçin 50px daire oluşturulur adım 8 'de, onu (Shift + Komut + Sağ Ayağı), ve düz renk doğrusal eğim aşağıdaki şekilde gösterilmektedir.
Alıntı:
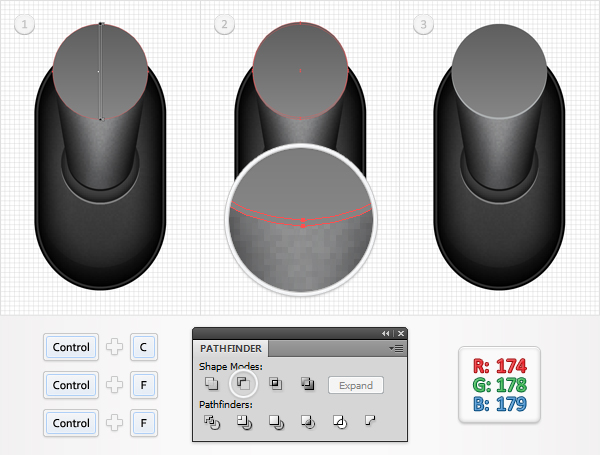
Step 20
Select the shape edited in the previous step and make two copies in front (Command + C > Command + F > Command + F). Select the top copy and hit the up arrow once. Reselect both copies and click on the Minus Front button from the Pathfinder panel. Fill the resulting shape with R=174, G=178, B=179.
Adım 20 Seçin düzenlenmiş şekli, bir önceki adım ve iki kopya ön (Komut + C > Komut + F > Komut + F). Seçim, üst kopyala ve yukarı ok. Her ikisini de seçin ve tıklatın Ön Eksi düğmesine Pathfinder. Doldurma ortaya çıkan şekil R=174, G=178, B=179.
Alıntı:
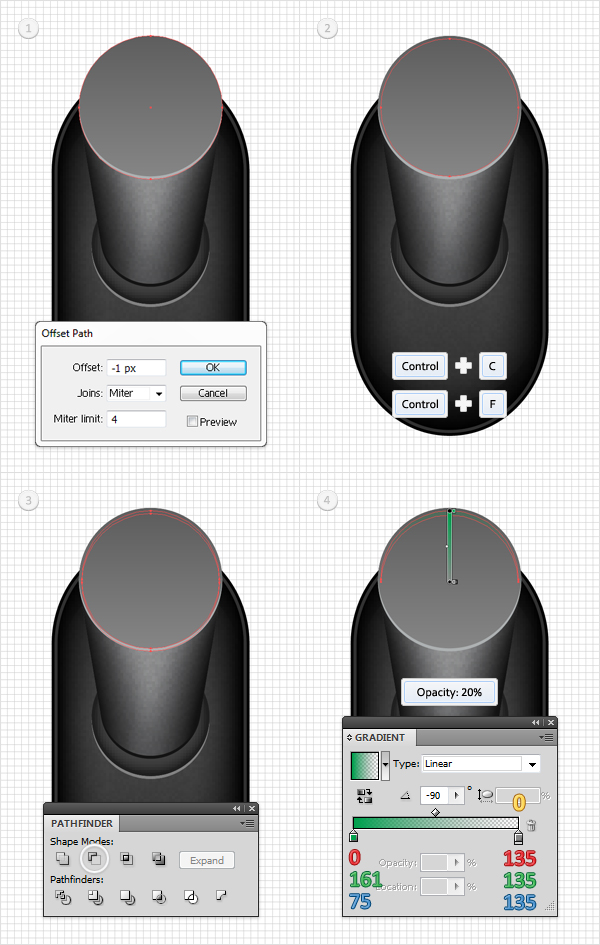
Step 21
Reselect the shape edited in step 19 and go to Object > Path > Offset Path. Enter a -1px Offset and click OK. Select the resulting shape and make a copy in front (Command + C > Command + F).
Select this copy and hit the down arrow once. Reselect both shapes and click on the Minus Front button from the Pathfinder panel. Fill the resulting shape with the linear gradient shown below and lower its Opacity to 20%.
Adım 21 Yeniden Seçin düzenlenmiş şekli adım 19 ve Nesne > Yol > Ofset Yolu. Bir Girin -1px Ofset ve TAMAM'ı tıklatın. Select ortaya çıkan şekil ve bir kopyasını da ön (Komut + C > Komut + F). Bu kopyalama ve aşağı ok tuşuna bir kez. Her ikisi de Yeniden seçin ve tıklatın Ön Eksi düğmesine Pathfinder. Doldurma ortaya çıkan şekil, linear gradient aşağıda gösterilen ve Yoğunluğu 20 %.
Alıntı:
Step 22
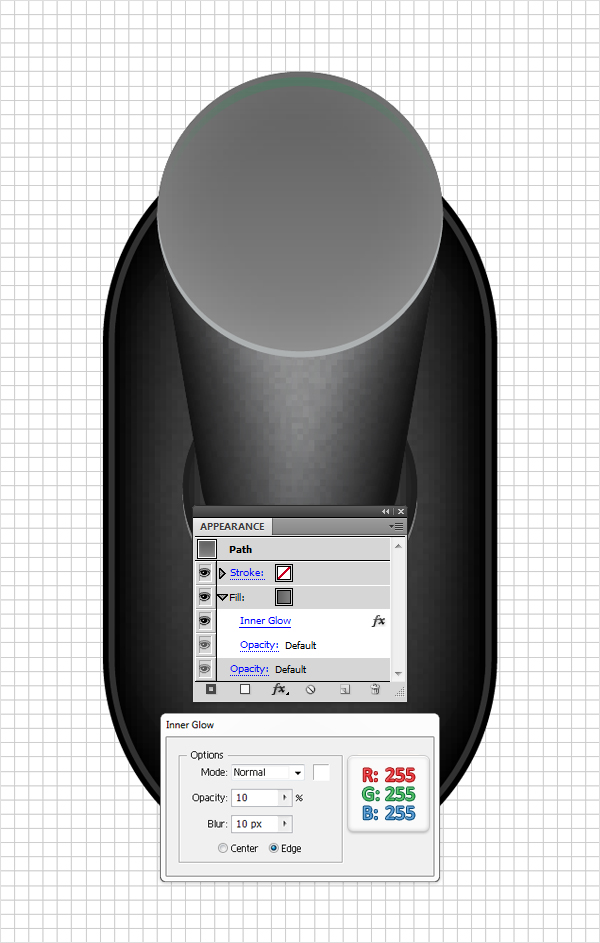
Reselect the shape edited in step 19 and focus on the Appearance panel. Select the existing fill and go to Effect > Stylize > Inner Glow. Enter the data shown below and click OK.
Adım 22 Yeniden Seçin düzenlenmiş şekli adım 19 ve Görünümü. Seçin ve git Etkisi > > Onaylı Uygulamalarla iç. Verileri Girin aşağıda gösterildiği gibi yerleştirin ve TAMAM'ı tıklatın.
Alıntı:
Step 23
Reselect the shape edited in the previous step and focus on the Appearance panel. Select the existing fill and duplicate it using the Duplicate Selected Item from the bottom of the Appearance panel. Select this new fill from the Appearance panel, lower its Opacity to 30%, and replace the exiting linear gradient with the one shown below. Remember that the yellow zero from the gradient image stands for Opacity percentage.
Adım 23 Yeniden Seçin düzenlenmiş şekli, bir önceki adım ve Görünümü. Select mevcut yağını doldurunuz ve yinelenen kullanarak bu Yinelenen Seçili öğeyi alt Görünümü. Bu yeni dolum, Görünüm, düşük Yoğunluğu % 30 've çıkma linear gradient ile aşağıdaki şekilde gösterilmektedir. Unutmayın, sarı sıfır, eğim görüntü için Yoğunluğu yüzde.
Alıntı:
Step 24
Reselect the shape edited in the previous step, focus on the Appearance panel, and add a third fill. Make it black, lower its Opacity to 7%, change the blending mode to Multiply, and go to Effect > Artistic > Film Grain. Enter the data shown below and click OK.
Adım 24 Yeniden Seçin düzenlenmiş şekli, bir önceki adım, focus, Görünüm, ekle ve üçüncü bir doldurma. Bu siyah, düşük Yoğunluğu - 7 %, karıştırma modu ile, ve Etkisi > Sanat > Film. Verileri Girin aşağıda gösterildiği gibi yerleştirin ve TAMAM'ı tıklatın.
Alıntı:
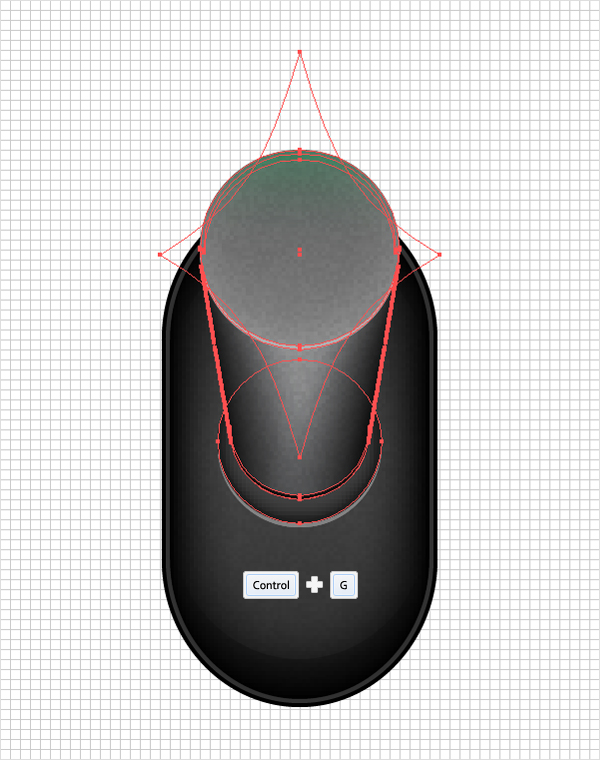
Step 25
Select all the shapes created in the last seventeen steps and group them (Command + G).
Adım 25 bütün şekiller, son on yedi adım ve grup (Komut + G).
Alıntı:
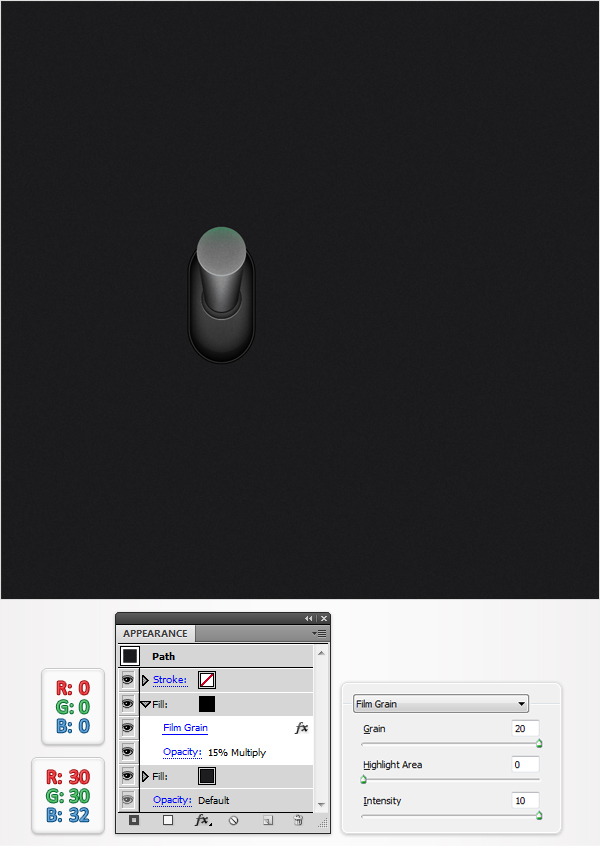
Step 26
Lets continue with the background. Pick the Rectangle Tool (M), create a shape the size of your artboard, fill it with R=30 G=30 B=32, and send it to back (Shift + Command + Left Bracket key). Continue in the Appearance panel and add a second fill. Make it black, lower its Opacity to 15%, change the blending mode to Multiply, and go to Effect > Artistic > Film Grain. Enter the data shown below and click OK.
Adım 26 devam edelim arka plan ile. "Dikdörtgen Aracı (M), bir şekil, boyut, artboard, doldurun R=30 G=30 B=32, ve geri (Shift + Komut + Sol ayağının anahtarı). Devam Görünüm ve ikinci bir doldurma. Bu siyah, düşük Yoğunluğu %15 değişim, karıştırma modu ile, ve Etkisi > Sanat > Film. Verileri Girin aşağıda gösterildiği gibi yerleştirin ve TAMAM'ı tıklatın.
Alıntı:
Step 27
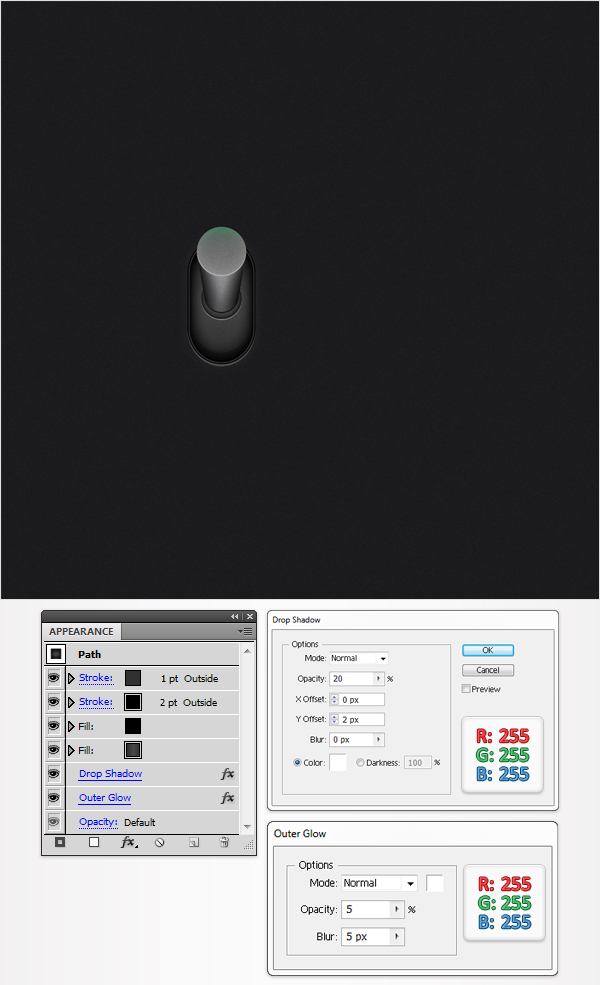
Reselect the rounded rectangle and go to Effect > Stylize > Drop Shadow. Enter the data shown below, click OK, then go to Effect > Stylize > Outer Glow. Again, enter the data shown below and click OK.
Adım 27 Yeniden Seçin, yuvarlaklaştırılmış dikdörtgen ve Etkisi > Onaylı Uygulamalarla > Gölge. Girin, aşağıdaki verileri, TAMAM'ı tıklatın, sonra git Etkisi > Onaylı Uygulamalarla > Dış Kızdırma. Tekrar girin, aşağıdaki verileri ve TAMAM'ı tıklatın.
Alıntı:
Step 28
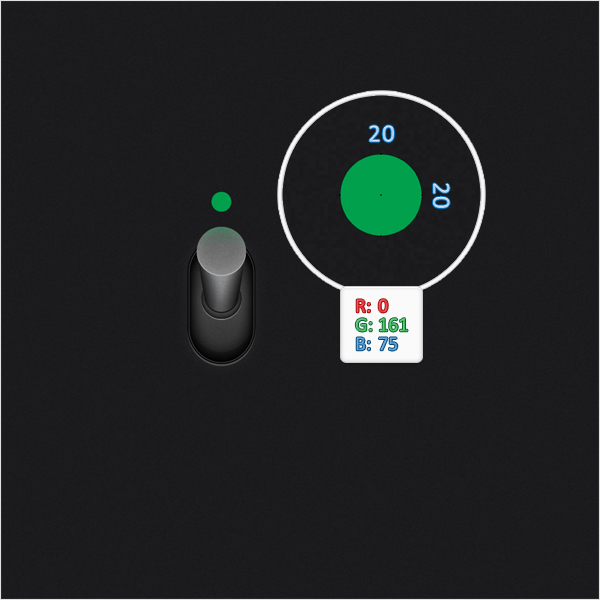
Re-enable the Snap to Grid (View > Snap to Grid). For the following step you will need a grid every 1px. So, go to Edit > Preferences > Guides & Grid and enter 1 in the Gridline every box. Pick the Ellipse Tool (L), create a 20px circle, fill it with R=0 G=161 B=75, and place it as shown below.
Adım 28 Yeniden etkinleştirme, Izgara (View > Snap to Grid). Aşağıdaki adım bir grid her 1px kablo bağlantısını Böylece, Düzen > Tercihler > Kılavuzları ve Grid ve 1 Kılavuz Çizgisini her onay kutusunu işaretleyin. "Elips Aracı (L), bir 20px daire, doldurun R=0 G=161 B=75, ve aşağıda gösterildiği gibi.
Alıntı:
Step 29
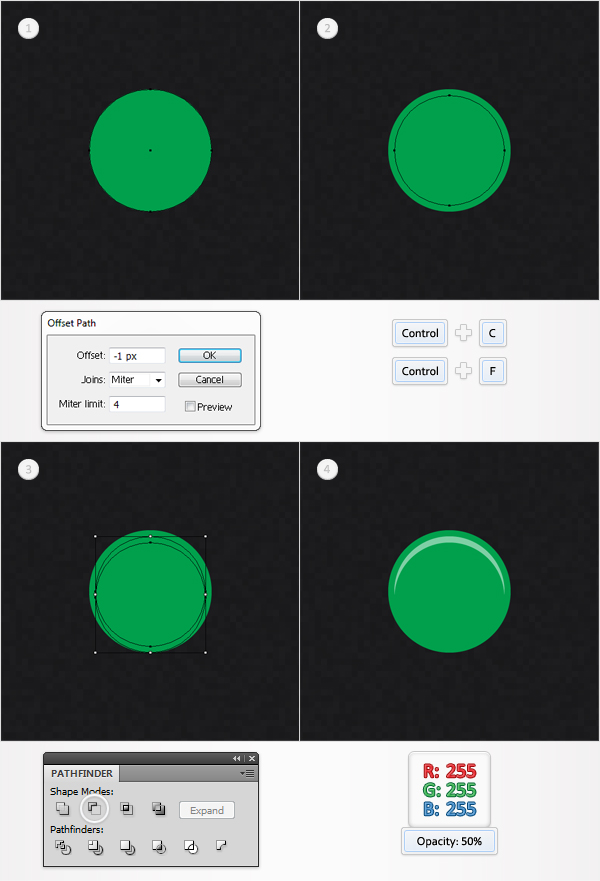
Reselect the green circle created in the previous step and go to Object > Path > Offset Path. Enter a -1px Offset and click OK. Select the resulting shape and make a copy in front (Command + C > Command + F).
Select this copy and hit the down arrow once. Reselect the two shapes created in this step and click on the Minus Front button from the Pathfinder panel. Fill the resulting shape with white and lower its Opacity to 50%.
Adım 29 Yeniden Seçin yeşil daire, önceki adım ve Nesne > Yol > Ofset Yolu. Bir Girin -1px Ofset ve TAMAM'ı tıklatın. Select ortaya çıkan şekil ve bir kopyasını da ön (Komut + C > Komut + F). Bu kopyalama ve aşağı ok tuşuna bir kez. Yeniden Seçin iki şekil de bu adım ve Eksi Ön düğme Pathfinder. Doldurma ortaya çıkan şekil beyaz ve Yoğunluğu 50 %.
Alıntı:
Step 30
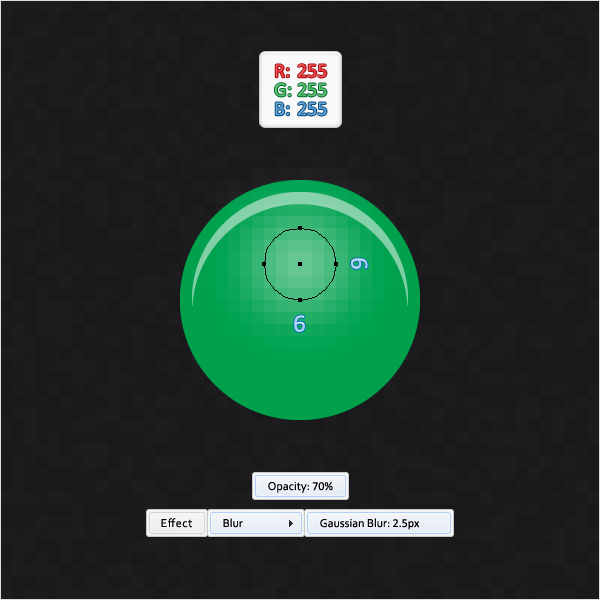
Pick the Ellipse Tool (L), create a 6px circle, fill it with white, and place it as shown below. Lower its Opacity to 70% and go to Effect > Blur > Gaussian Blur. Enter a 2.5px radius and click OK.
Adım 30 Pick Elips Aracı (L), 6px daire, bu beyaz ve aşağıda gösterildiği gibi. Düşük Yoğunluğu %70 ve Etkisi > Blur > Gauss. Bir 2.5px radius ve TAMAM'ı tıklatın.
Alıntı:
Step 31
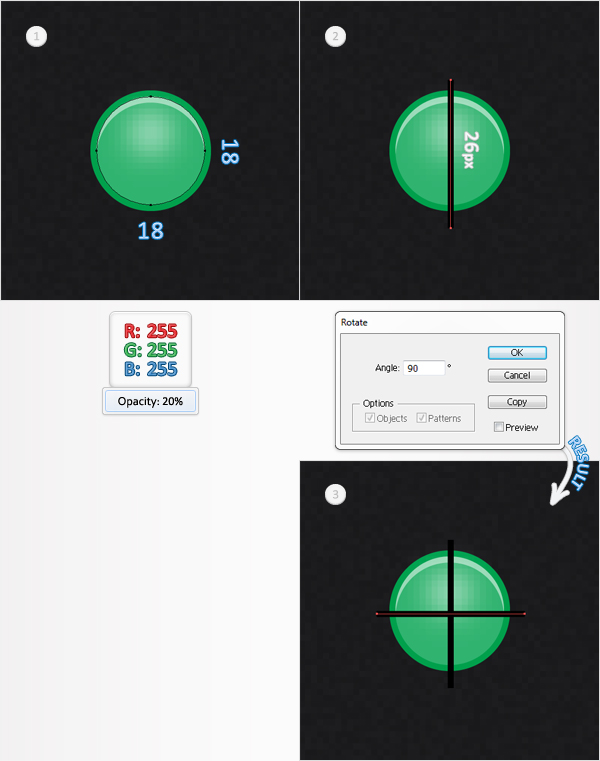
Pick the Ellipse Tool (L), create an 18px circle, and place it as shown in the first image. Fill it with white and lower its Opacity to 20%. Switch to the Pen Tool (P), draw a 26px vertical line, and place it as shown in the second image.
Select it and go to Object > Transform > Rotate. Enter a 90 degrees angle and click on the Copy button. This will add a horizontal line, as shown in the third image.
Adım 31 Pick Elips Aracı (L), bir 18px daire, ve gösterildiği gibi ilk görüntü. Ile Doldurun beyaz ve Yoğunluğu 20 %. Anahtar, Kalem Aracı (P), bir 26px dikey çizgi, ve gösterildiği gibi ikinci bir görüntü. Seçiniz ve Nesne > Transform > Döner. Bir Girin 90 derece açı ve Kopyalama tuşu. Bu yatay bir çizgi, 'de gösterildiği gibi, üçüncü resim.
Alıntı:
Step 32
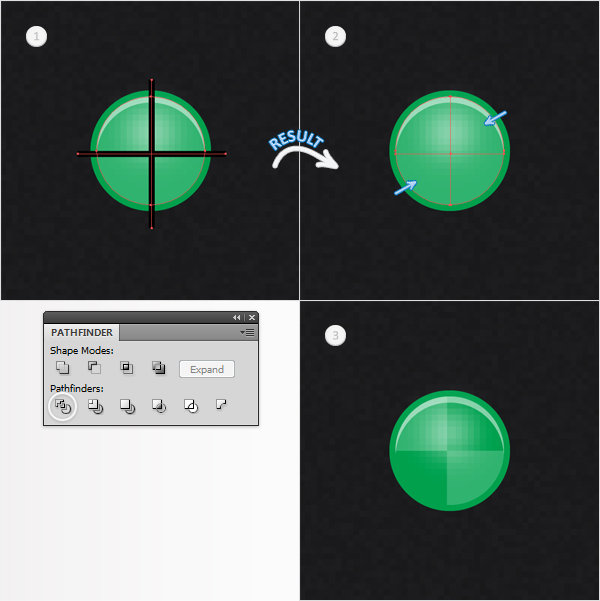
Select the circle, and the two lines created in the previous step, and click on the Divide button from the Pathfinder panel. This will divide your circle into four separate shapes. Select the top, right shape and the bottom, left shape and delete them.
Adım 32 daireyi işaretleyin, ve iki satır, önceki adım, ve Bölme (Pathfinder. Bu bölme, daire dört ayrı ayrı şekiller. Seçim, üst, sağ şekil ve alt, sol şekil ve bunları silin.
Alıntı:
Step 33
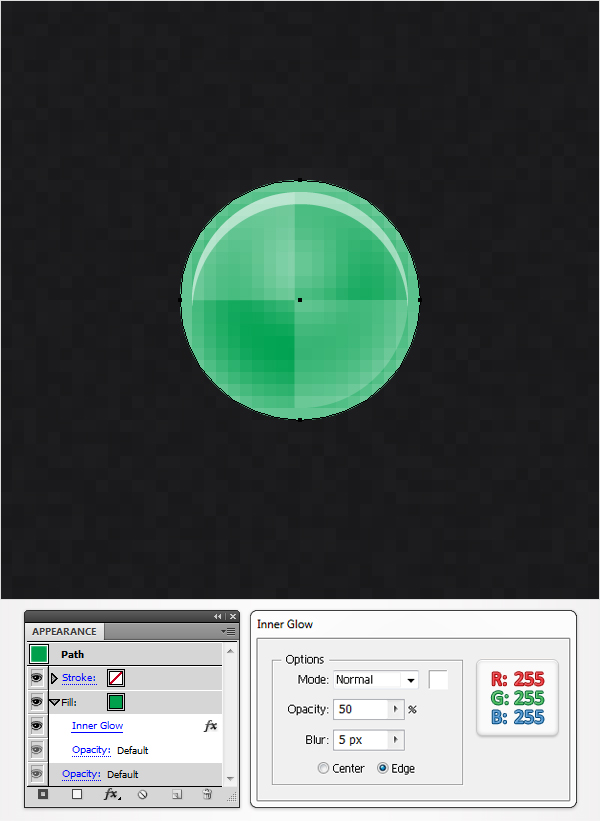
Reselect the green circle and focus on the Appearance panel. Select the existing fill and go to Effect > Stylize > Inner Glow. Enter the data shown below and click OK.
Adım 33 Yeniden Seçin yeşil daire ve Görünümü. Seçin ve git Etkisi > > Onaylı Uygulamalarla iç. Verileri Girin aşağıda gösterildiği gibi yerleştirin ve TAMAM'ı tıklatın.
Alıntı:
Step 34
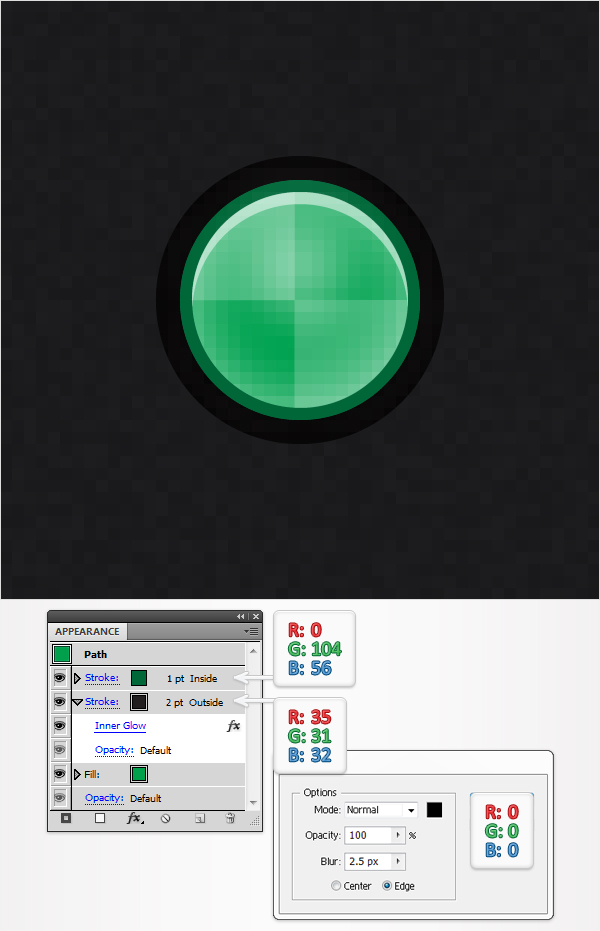
Reselect the green circle and add a first stroke. Select it from the Appearance panel, make it 2pt wide, and set its color at R=35, G=31, B=32. Now align it to outside and go to Effect > Stylize > Inner Glow. Enter the data shown below and click OK. Add a second stroke for your green circle. Make it 1pt wide, set its color at R=0 G=104 B=56, and align it to inside.
Adım 34 Yeniden Seçin yeşil daire ve bir ilk. Seçin pano görünümü, 2pt geniş ve rengi de R=35, G=31, B=32. Artık bt dış ve Etkisi > > Onaylı Uygulamalarla iç. Verileri Girin aşağıda gösterildiği gibi yerleştirin ve TAMAM'ı tıklatın. Ikinci bir hareket için yeşil daire. Bunu 1pt geniş, renkli R=0 G=104 B=56, ve göre hizalayın.
Alıntı:
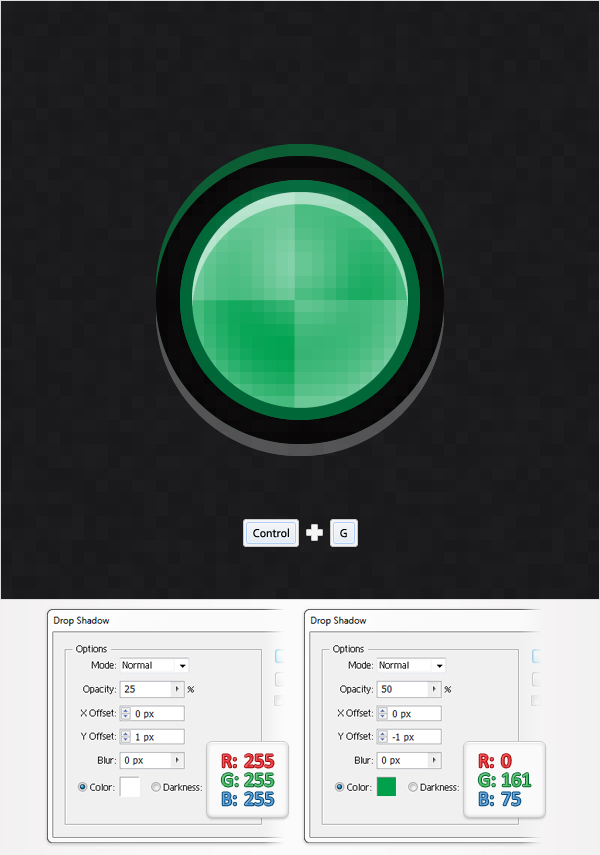
Step 35
Reselect the green circle and go to Effect > Stylize > Drop Shadow. Enter the data shown in the left window, click OK, then go again to Effect > Stylize > Drop Shadow. Enter the data shown in the right window and click OK. Select all the shapes created in the last seven steps and group them (Command + G).
Adım 35 Yeniden Seçin yeşil daire ve Etkisi > Onaylı Uygulamalarla > Gölge. Verileri Girin solda gösterilen) penceresinde OK (TAMAM) düğmesini tıklatın, ardından tekrar Etkisi için Onaylı Uygulamalarla > > Gölge. Verileri Girin sağda gösterilen cam ve TAMAM'ı tıklatın. Bütün şekiller, son yedi adım ve grup (Komut + G).
Alıntı:
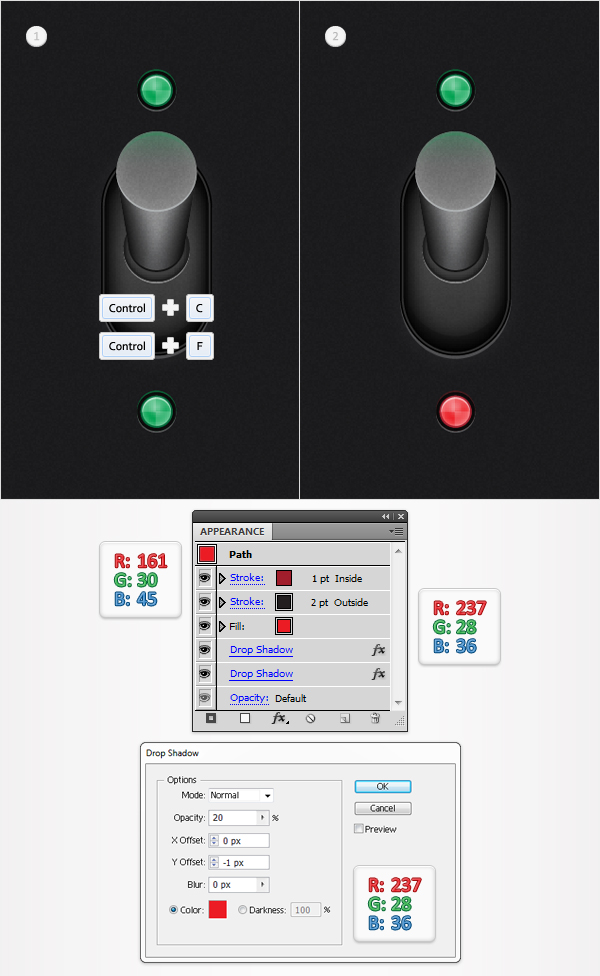
Step 36
Select the group created in the previous step, duplicate it, and move the copy down as shown in the first image. Select the green circle inside this new group and focus on the Appearance panel. Simply, replace the green tints with the red ones shown in the following image. Also, dont forget to edit the second Drop Shadow effect applied for the circle.
Adım 36 Seçin oluşturulan grup, bir önceki adım, yinelenen, ve kopyalama gösterildiği gibi aşağı ilk görüntü. Bu Seçin yeşil daire içinde bu yeni grup ve Görünümü. Tek yapmanız gereken, yerine yeşil ile fotoğraflarınızın tonlarını, kırmızı olanlar aşağıdaki görüntü. Ayrıca, unutmayın düzenlemek için ikinci gölge efekti için uygulanır.
Alıntı:
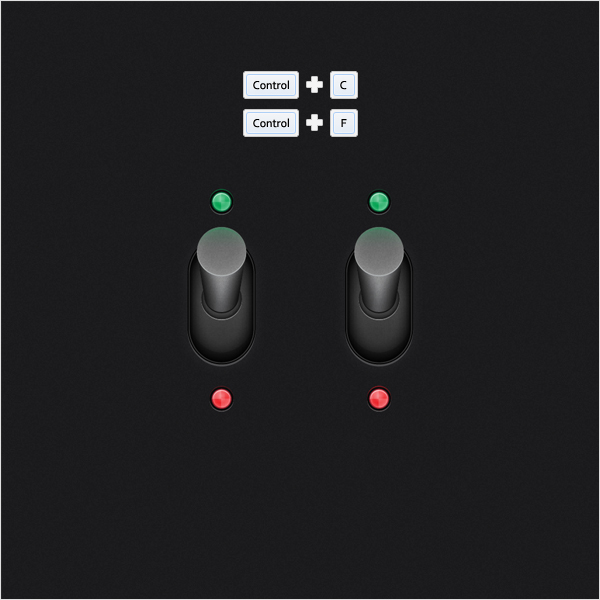
Step 37
Select the three groups created so far and duplicate them. Select these copies and drag them to the right as shown.
Adım 37 Seçin, üç grup oluşturuldu bugüne kadar ve çift. Bu kopyalar ve onları doğru gösterildiği gibi.
Alıntı:
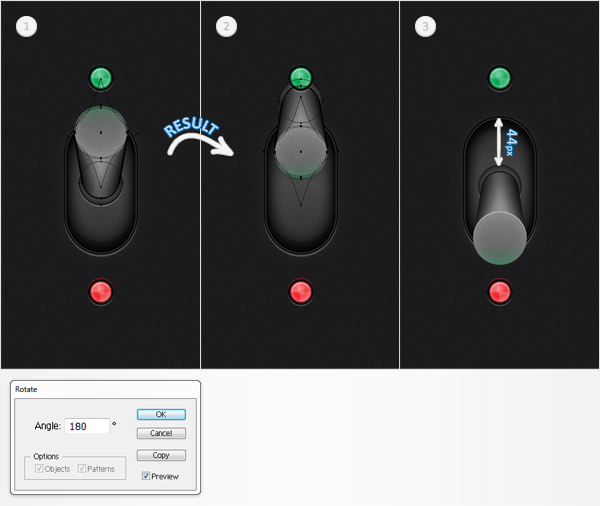
Step 38
Focus on the group copies created in the previous step. Select the second one and go to Object > Transform > Rotate. Enter a 180 degrees angle and click OK. Now, your group should look like the second image. Select it and drag it down as shown.
Adım 38 Odak grup oluşturulan kopyalar, bir önceki aşamaya geçiniz. Seçin, ikinci ve Nesne > Transform > Döner. Bir 180 derece açı ve TAMAM'ı tıklatın. Şimdi, grup olmalıdır ikinci görüntü. Seçin ve sürükleyip gösterildiği gibi aşağı doğru.
Alıntı:
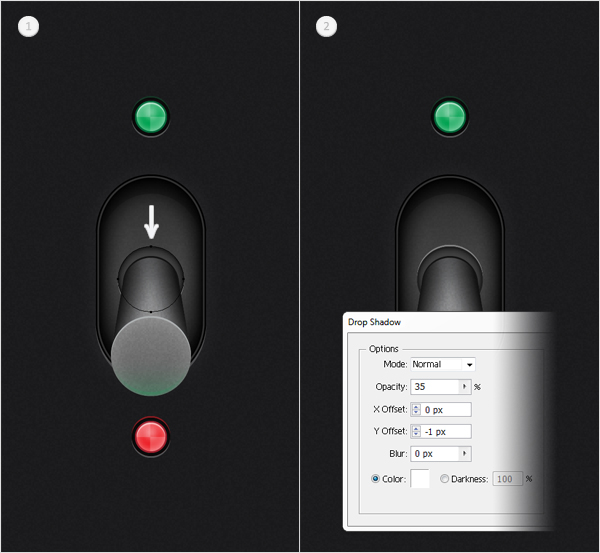
Step 39
Focus on the group edited in the previous step. Select the top circle inside the group, open the existing Drop Shadow effect, and edit it as shown in the second image.
Adım 39 Odak grup düzenlenen önceki aşamaya geçiniz. Seçim, üst daire içindeki, açık, var olan gölge efekti, düzenle ve gösterildiği gibi ikinci bir görüntü.
Alıntı:
Step 40
Keep focusing on the group edited in the previous step. Select the bottom circle and replace the green gradient with the red gradient shown below. Also, select the thin, green shape and use the same red gradient.
Adım 40 Tutun, grup düzenlenen önceki aşamaya geçiniz. Seçin, alt daire ve yerine yeşil eğim, eğim kırmızı aşağıda gösterilmiştir. Ayrıca, ince, yeşil şekil ve aynı kırmızı.

Alıntı:
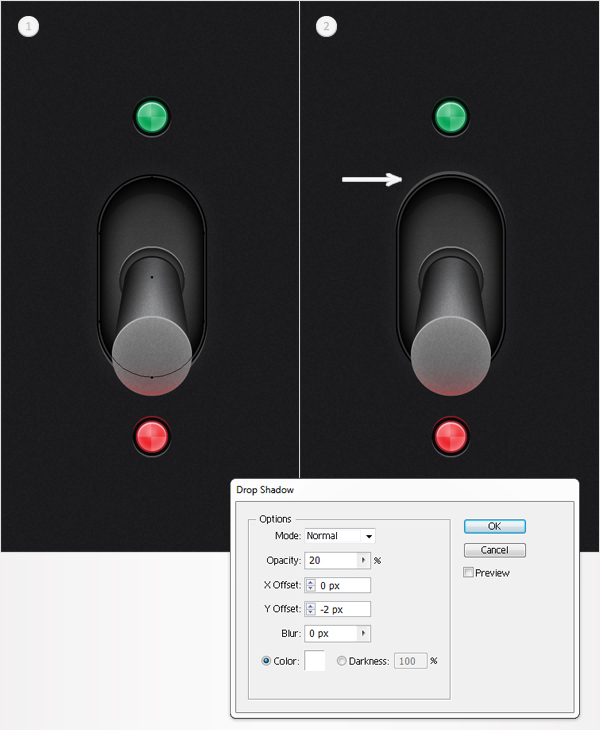
Step 41
Select the rounded rectangle from the group copy, open the existing Drop Shadow effect, and edit it as shown in the second image.
Adım 41 Seçin, yuvarlaklaştırılmış dikdörtgen, grup, açık, var olan gölge efekti, düzenle ve gösterildiği gibi ikinci bir görüntü.
Alıntı:
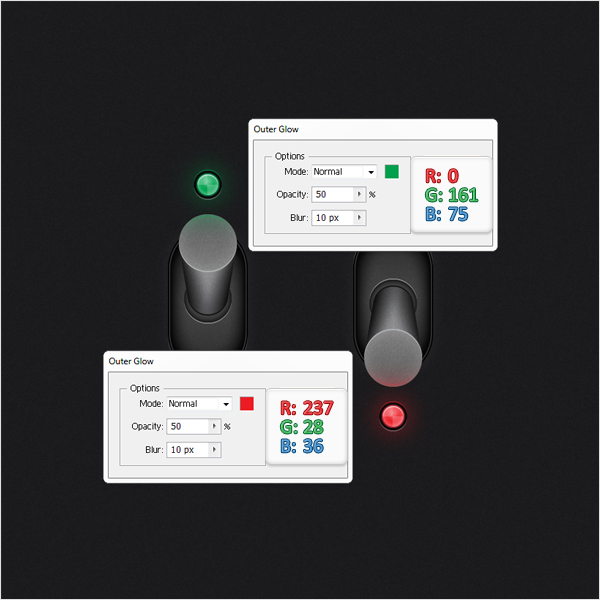
Step 42
Lets add some extra details for the light, which are supposed to be turned on. Select the green circle placed above the left button and go to Effect > Stylize > Outer Glow. Enter the data shown below and click OK. Select the red circle placed below the right button and go to Effect > Stylize > Outer Glow. Enter the data shown below and click OK.
Adım 42 Şimdi bazı ek ayrıntılar için, olarak bilinen açık. Seçin yeşil daire üstüne yerleştirilen sol tuş ve git Etkisi > Onaylı Uygulamalarla > Dış Kızdırma. Verileri Girin aşağıda gösterildiği gibi yerleştirin ve TAMAM'ı tıklatın. Seçin, kırmızı çember altında bulunan sağ tuş ve git Etkisi > Onaylı Uygulamalarla > Dış Kızdırma. Verileri Girin aşağıda gösterildiği gibi yerleştirin ve TAMAM'ı tıklatın.
Alıntı:
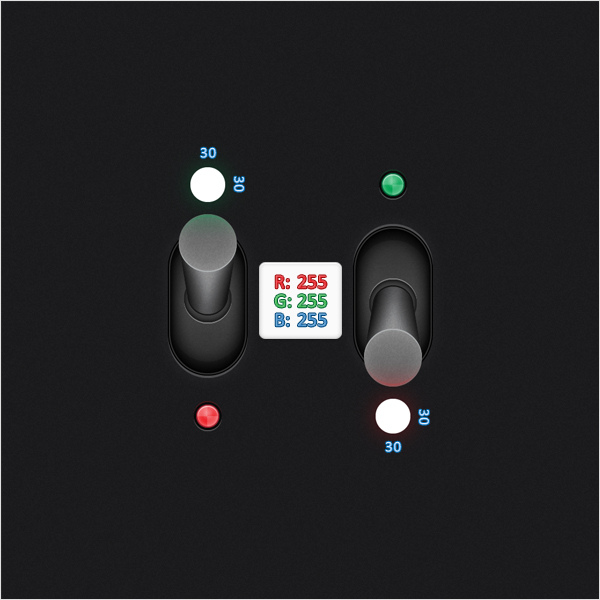
Step 43
Keep focusing on the two lights edited in the previous step. Pick the Ellipse Tool (L), create two 30px circles, fill them with white, and place them as shown below.
Adım 43 Tutun, iki ışık da düzenlenen önceki aşamaya geçiniz. Alma, Elips Aracı (L), iki 30px daireler, bunları doldurmak ile beyaz, ve bunları aşağıda gösterildiği gibi.
Alıntı:
Step 44
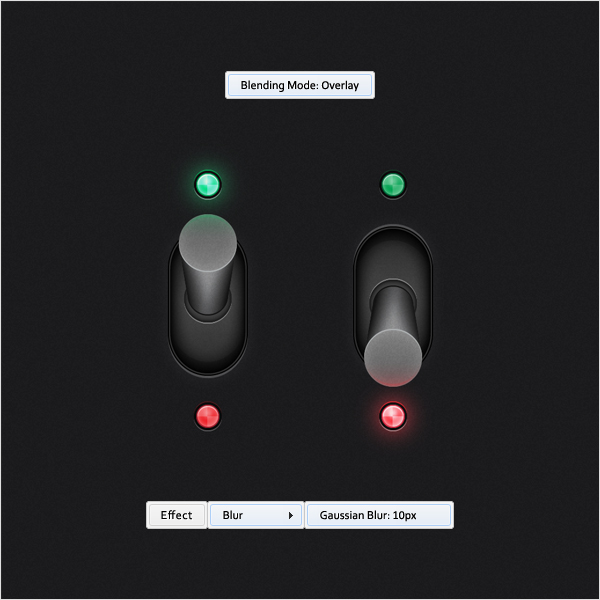
Reselect the white circles created in the previous step, change their blending mode to Overlay, and go to Effect > Blur > Gaussian Blur. Enter a 10px radius and click OK.
Adım 44 Yeniden Seçin beyaz daire içinde oluşturulan önceki adım, onların karıştırma modu yerleştirmek için, ve Etkisi > Blur > Gauss. Bir Girin 10px radius ve TAMAM'ı tıklatın.
Alıntı:
Step 45
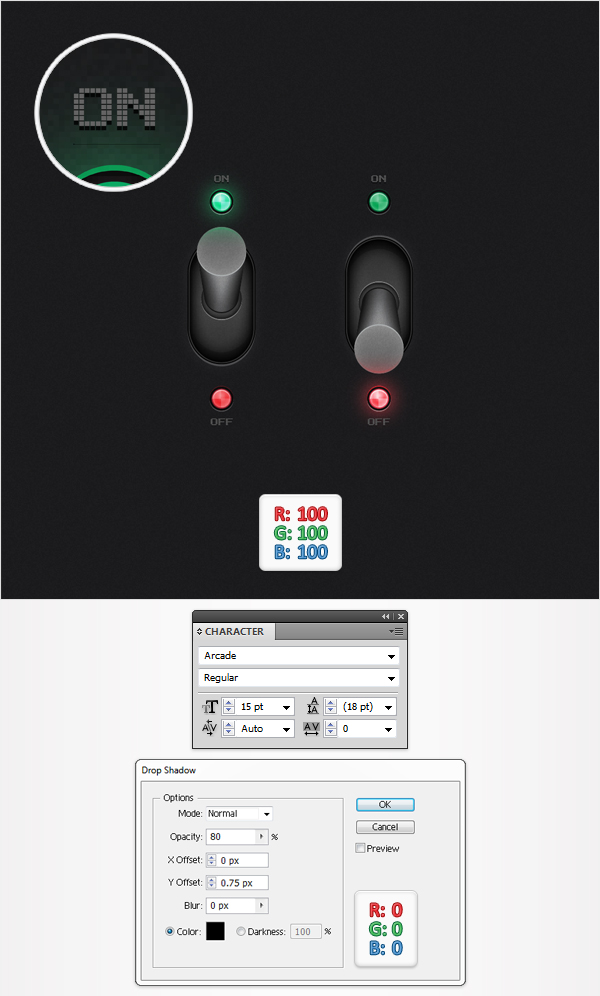
Finally, add some text. Pick the Type Tool (T) and add the On/Off text as shown in the following image. Use the Arcade font with a size of 10pt and set its color at R=100, G=100, B=100. Select all this text and go to Effect > Stylize > Drop Shadow. Enter the data shown below, click OK, and youre done.
Adım 45 Son olarak, bazı metin. "Type Tool (T) ve Açık/Kapalı metin aşağıdaki resimde gösterildiği gibi. Kullanım, atari-bilgisayar oyunları ile yazı boyutu 10 pt ve rengi de R=100, G=100,B=100. Tüm bu metin ve Etkisi > Onaylı Uygulamalarla > Gölge. Girin, aşağıdaki verileri, TAMAM'ı tıklatın ve yaptın.
Alıntı:
Conclusion
Now your work is done. Here is how it should look.
Sonuç Şimdi iş tamam.
Kaynak : vector.tutsplus
Anlatım ingilizceydi program kullanarak çevirisini yaptım
