Ayyıldız2 | 2008 TR Yapısı • 1-99 Orta Emek Destan • Oto Avsız • 10 Temmuz 21:00 HEMEN TIKLA!

Alıntı:
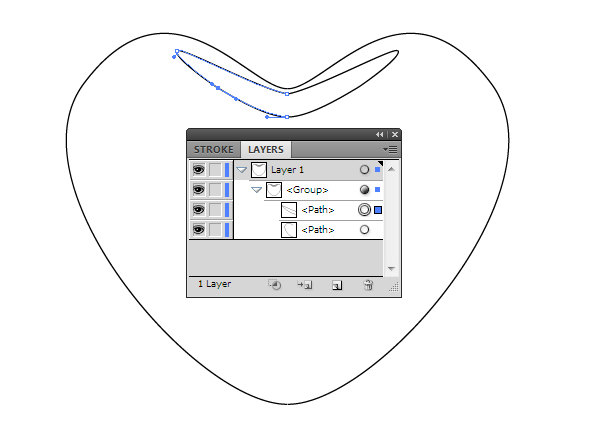
Step 1
Take the Pen Tool (P) and create a schematic half of the heart with 3 anchor points. Pay attention, the path is open. For your convenience, I recommend you enable the Smart Guides (View > Smart Guides).
Adım 1 , Kalem Aracı (P) ve bir tanı şeması yarım kalp 3 bağlantı noktaları. Dikkat edin, yolu açık. Kolaylık için, I öneriyoruz, Akıllı Kılavuzları (Görünüm > Akıllı Kılavuzları).

Alıntı:
Group the received object (Object > Group (Command + G)).
Grup, alınan nesne (Object > Grup (Komut + G)).

Alıntı:
Keep the group selected and go the Effect > Distort & Transform > Transform in the dialog box and set the settings shown on the picture below.
Seçilen grup ve Etkisi > Bozan ve Transform > Transform diyalog kutusunda ve ekranda gösterilen ayarları aşağıdaki resim.

Alıntı:
As a result, we get a mirroring of the object.
Sonuç olarak, bir yansıtma nesne.
Alıntı:
Step 2
All the changes made with the object will be reflected in its copy. Now select and convert corner anchor points to smooth.
Adım 2 Tüm değişiklikler nesne ile yansıtılır, kopya. Şimdi seçim ve köşe bağlantı noktaları için.

Alıntı:
Driving handles of smooth points, create a heart shape.
Sürüş kulpları yumuşak noktaları oluşturmak, bir kalp şekli.

Alıntı:
Now create highlights. Take the Pen Tool (P) and draw a half of the highlight. Drag it to the group, to which the effect of transformation was applied.
Şimdi. , Kalem Aracı (P) ve bir yarım. Bunu grup, etkisi dönüşüm uygulandı.

Alıntı:
Edit the form using the Direct Selection Tool (A). Create side and central highlights using the technique described above.
Edit form kullanarak Doğrudan Seçim Aracı (A). Yan oluşturmak ve merkezi özellikleri kullanarak, tekniği.


Alıntı:
Step 3
Select the group and go to the Object > Expand Appearance. As result, we got the object of the second half of the heart.
Adım 3 grubu seçin ve Object > genişletin. Sonuç olarak, burada, nesne, ikinci yarım kalp.

Alıntı:
Ungroup all objects twice with the Object > Ungroup (Command + G).
Ungroup tüm nesneleri ile iki kez Nesne > Ungroup (Komut + G).

Alıntı:
With the Direct Selection Tool (A) or the Lasso Tool (Q) select the lowest point position where the left and the right halves join, and go the Object > Path > Join (Command + J).
Doğrudan Seçim Aracı (A) veya Kement aracı (Q) seçin, en düşük noktası konumu sol ve sağ yarımlarını, ve Nesne > Yol > (Komut + J).

Alıntı:
Using this technique, join all the points of contact.
Bu tekniği, tüm noktaları.
Alıntı:
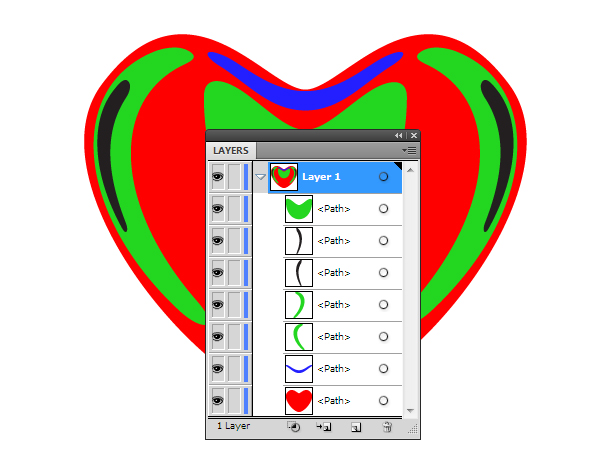
Step 4
Lets start working with a heart shape. For training purposes I turn off the visibility in the panel of layers for all objects we are not working with. Using the Mesh Tool (U) create the Gradient Mesh.
Adım 4 Şimdi çalışmaya bir kalp şekli. Eğitim amaçlı olarak I kapatın, görünürlük paneli katmanları tüm nesneler için bu çalışma ile. Ile Ağ Aracı (U) Eğim Gözlü..

Alıntı:
Color the gradient mesh nodes in two colors: pink and dark red (I use RGB color mode (File > Document Color Mode > RGB color)).
Renk eğimi ağ düğümleri iki renk: pembe ve koyu kırmızı (I RGB renk modu (Dosya > Belge Renk Modu > RGB renk)).

Alıntı:
Set the Screen Blending Mode for the heart-shape in the Transparency panel.
Ekran Karıştırma Modu için kalp şekli Şeffaflık.

Alıntı:
Step 5
Fill in the form of the flare with a linear gradient, which consists of gray and black colors. Keep the objects selected, set the Screen Blending Mode in the Transparency panel.
5. Adım formu doldurun, oturaklı bir doğrusal eğim, gri ve siyah renk. , Nesneleri, Ekran Karıştırma Modu Şeffaflık.

Alıntı:
Apply the described techniques to other highlights.
Uygulayınız teknikleri açıklanan diğer özellikleri.


Alıntı:
Select and group all the objects of the heart (Command + G).
Öğesini Seçin ve grup tüm nesneleri (Komut + G).
Alıntı:
Step 6
Create a background with the Rectangle Tool (M). Fill it with radial gradient, which consists of the shades of dark red color.
6. Adım bir arka plan ile Dikdörtgen Aracı (M). Ile Doldurun radyal eğim, oluşan renkler koyu kırmızı renk.

Alıntı:
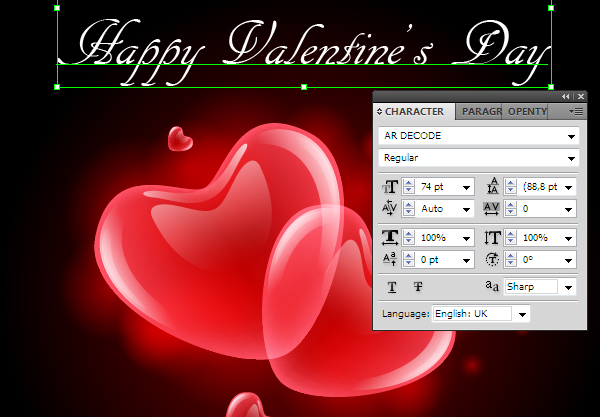
Step 7
Set the heart on the background and duplicate it, change the size of copies and turn them while to create the composition.
7. Adım kalp arka plan ve çift, boyutunu değiştirme kopyalar ve onları yaratmak için.

Alıntı:
On Valentines Day, a holiday of people who are in love, everyone gives greeting cards to each other. This day is a good opportunity to show your feelings with an unusual gift. Ill tell you how to create a vector-card for this holiday of love. This artwork was created by my student Eugene Nikandrov.
Sevgililer Günü, tatil olan kişiler aşk, herkes size tebrik kartları. Bu gün iyi bir fırsat, duygularını bir hediye. BEN size nasıl bir vektör-kartı için bu tatil. Bu çizimlerden oluşturulan my öğrenci Eugene Nikandrov.
Alıntı:
Step 8
Create glow around the hearts. Take the Ellipse Tool (L) and create a circle, fill it with radical gradient which consists of the shades of dark red.
Adım 8 ışıltı oluşturun, kalpleri. , Elips Aracı (L) ve bir daire, bu radikal eğim oluşan gölge koyu kırmızı.

Alıntı:
Duplicate the received object and change its shape to crate a glow.
Çift, alınan nesne ve şekli bir sandık.


Alıntı:
Step 9
With the help Type Tool (T) write your greetings.
9. Adım ile Takım (T) yazma, selam.
Alıntı:
Conclusion
I hope that you have enjoyed this tutorial. Have a happy holiday!
Sonuç umarım iyi vakit geçirdiğinizi bu öğretici. Bir mutlu tatil!
Kaynak : vector.tutsplus
Anlatım ingilizceydi program ile çevirdim.
Son düzenleme: